I was at Staples for the BF 2007 sale and picked up the bigger digital frame for my mom. The Omnitech 11.3 appears to be a rebrand of the same unit sold by Smartparts for its SP1100. Getting pictures to work was fairly straightfoward. Plug in a card or load something into its internal media and away it goes. The slideshow is default at 5 seconds. One thing to watch out for, the slideshow menu doesn't give you any setup options. You have to be at the photo/video/music menu then press Menu on the rear of the display or Setup on the remote to get to all the options. But even with the Optimal scaling option activated it doesn't scale portrait pictures as nicely as I'd like. But if you resize your images it works well as long as a scaler isn't involved. The LCD likes 16:9 resolution and its 800x400 screen is decent enough.
The tough part was getting video working correctly. I have a Canon S410 and its AVI files play okay on the unit. The 4:3 video was stretched to the 16:9 screen and the audio played fine. But getting my own HDV/DV/WMV/MP4 to playback wasn't straight forward. For one, the unit needs the video to be in an AVI container. And MPEG-4 codecs are not recognized. It seems the software was optimized for the kind of video recorded by digital cameras. So after editing via Sony Vegas I had to pass the video through SUPER(c). 640x360 video with M-JPEG and PCM in an AVI container worked.
There's a music function but it doesn't appear to playback MP3 files. It will take WMA audio files (ironically it doesn't play WMV). I had to install Windows Media Encoder and VCM to convert the music. I'm not sure how Mac users would be able to get around this. And I like how slideshow will play the WMA concurrently but wish that it would playback my AVI files as part of the shuffle. Oh well, can't have everything.
Friday, December 7, 2007
Wednesday, November 28, 2007
Convert 60i to 60p Revisited
A few questions were posted to me via YouTube on how to do 60i to 60p conversion. In a previous post I showed how to use Vegas velocity envelopes to do time remap effects. But I only mentioned the conversion process in passing with thread links on how to do it. For convenience here are two methods that have worked for me:
Standard Vegas
1) Create a Custom Project with 60p frame rate
File -> Properties -> Video -> Field order: None (progressive scan) -> Frame rate: 59.940 (Double NTSC) -> Save -> Ok
2) Load your HDV clip
3) Enable Smart Resample (this is default)
Right-click on clip -> Properties -> Smart Resample -> Ok
4) Encode video to a 60p progressive format
File -> Render As -> Pick a codec capable of progressive -> Custom -> Frame rate: 59.940 -> Apply -> Give the file a name -> Save
Mike Crash Smart Deinterlace Plugin
1) Create a Custom Project with 60p frame rate
File -> Properties -> Video -> Field order: None (progressive scan) -> Frame rate: 59.940 (Double NTSC) -> Save -> Ok
2) Load your HDV clip
3) Disable Smart Resample
Right-click on clip -> Properties -> No Resample -> Ok
4) Apply Smart Deinterlace to the video track
Video FX -> Smart Deinterlace (you must have loaded the plug-in previously) -> Drag effect to the track (not to the clip) -> Ok (use defaults)
5) Encode video to a 60p progressive format
File -> Render As -> Pick a codec capable of progressive -> Custom -> Frame rate: 59.940 -> Apply -> Give the file a name -> Save
Gotcha
The critical part is to encode in a progressive codec. HDV is interlaced. When using the Main Concept codec go to the Video tab and select Output Type MPEG-2. WMV and MP4 are always progressive.
References:
Glenn Chan's notes on Mike Crash's filter
http://dvinfo.net/conf/showthread.php?t=52097
Sunday, November 4, 2007
Simple Cutout Animation with CreaToon
If you're looking for a simple 2D animation package look no further! CreaToon is great for simple cutout animation like talking heads. Before I found this I was going to use Blender 3D and learn all the rigging. It saved me some time coming up with a funny effect I wanted.
CreaToon can take most image formats such as JPEG, Targa, and PNG. I like PNG as it allows for Alpha Channels to make the background transparent. This means I could edit a graphic using Paint.NET then animate it. Attaching the body parts of an animation is easy to follow through the online tutorial. Within half a day I had a minute long voiceover and animation sequence working together for my cutout characters.
With the sequence done I was able to put it in front a green background and export to AVI. Imported into Sony Vegas I applied a Chroma Key reapplied the audio and was all set. CreaToon was also capable of exporting image sequences but this method seemed easier for my style of editing.
References:
http://www.creatoon.com/index.php
Sunday, September 9, 2007
Slowmo and Speed Up Effect 300-style
Here's my attempt at the 300 style special effect. It works quite well for the HV20 with its high resolution picture and choice of manual settings. Good light is important to allow TV-500 or TV-250 mode. This eliminates motion blur. Shoot from a stable platform to reduce obvious rolling shutter. Then capture your 60i.
Convert your 60i to 60p using your choice of deinterlacer. Smart Deinterlace based on VirtualDub's works quite well. As for the codec, choose one that supports 60p such as Lagarith/Uncompressed AVI, WMV or H.264. Then feed the clip to an NLE that can do velocity envelope/time remapping. Speed up/ramp up the broad movements while at wide. When you find the terminus of an action, back off a bit then slow down to at least half normal speed (I like to go down to 0% in a V or U for Vegas velocity envelopes). Keep that for a few seconds then return to normal. To accentuate the slow mo portion, use digital zoom to the area of action.
Sony Vegas example:
 http://img127.imageshack.us/img127/9803/300stylevegassettingsls7.jpg
References:
http://dvinfo.net/conf/showthread.php?t=64785&page=2&highlight=ghost
http://dvinfo.net/conf/showthread.php?t=93587
Friday, July 27, 2007
Sleep is Close Behind
Shot in PF24 mode with Shutter Priority (TV) 6. Camera was inside the car propped against a seat on a monopod and a backpack. Driving was done well within the speed limit trying to avoid large bumps. Captured footage to Sony Vegas as M2T then increased speed to 12x by setting clip speed to maximum (4x) and adding maximum velocity envelope (3x).
Sunday, July 15, 2007
Bleach Bypass on HDV
I've been trying out various Bleach Bypass techniques on 60i and 24p footage. It appears source matters a lot. HDV is 4:2:0 while DV is 4:1:1 for NTSC. It appears that DV with its compressed colors is easier to bleach using color curves, saturation, and color overlay. HDV, at least the color rich kind made by the HV20, needs to be desaturated to as low as 20% on the bottom layer. Sometimes it even helps to give a color tinge to the entire clip too. More experimentation to be done!
References:
http://www.finalcolor.com/bleach.htm
http://www.creativecow.net/articles/onneweer_barend/colorgrading_1/index.html
http://www.dvinfo.net/conf/showthread.php?t=14222&highlight=kings
http://www.sundancemediagroup.com/articles/glennchan/levels_in_sony_vegas_part_two.htm
References:
http://www.finalcolor.com/bleach.htm
http://www.creativecow.net/articles/onneweer_barend/colorgrading_1/index.html
http://www.dvinfo.net/conf/showthread.php?t=14222&highlight=kings
http://www.sundancemediagroup.com/articles/glennchan/levels_in_sony_vegas_part_two.htm
Monday, May 21, 2007
Melancholy of a Travelling Man
Low resolution 320x200 version further compressed by Youtube Sorenson codec.
Shot in PF24 mode mostly in TV 48 with custom effect. Shallow DOF in the opening scene was achieved using 28mm Nikon f/2.0 at full wide. The wild flower scene used the standard lens taking advantage of the shallow DOF inherent in the 1/2.7" sensor. Custom effect was Color Depth 0, Sharpness -1, Contrast -1, Brightness -1. The only shot with color correction was the city lights view from the air. Gamma was adjusted to hide the low light grain.
Monday, May 14, 2007
Things to consider for 24 frames per second
I've almost always shot progressive. It builds discipline. The higher frame rate of 60i has it uses but most of the time I still shoot as if I'm on 30p/24p. Here is a video to help illustrate some of the differences in style when using lower frame rates. 35mm users trying to emulate film style probably learn this as they go along.
Sorry, video unavailable due to Stage6 shutting down.
Original video is 720x400 which can be run fullscreen.
Apologies if DivX player doesn't agree with you.
The two basic rules are:
1) Avoid sudden movements
2) Try to shoot from a fixed position
All these shots were taken with a monopod. In the beginning of the above video I do a relatively slow pan. As you will notice, the fast moving objects like cars and people show a bit of the 24p stutter. Higher frame rates are better for higher movement. If you need to move fast or capture really fast objects look at 60i. Besides the subjects you have to consider your own movement. Panning takes patience and thinking ahead. You have to learn how fast you can twist the video head and appear smooth. And don't try to stop the head too quickly unless its an effect you mean to use. It can be jarring.
In the middle part I walk with the monopod to the middle of the center island. The shock of walking, especially with my flat footed step, can send the camcorder bobbing and yawing all over the place. The stuttering effect of 24p accents this. Unless you're trying to duplicate the beachhead scene from Saving Private Ryan you may not want to move around with 24p unless you have a well balanced base. I've driven in cars with 24p and gotten good video. But walking is always tricky.
In the later middle portion I show 24p sped up. Its a bit of a cheat. I would have used a sky scene but didn't have one. Sped up footage of nature scenes look nice when all the frames are progressive.
In the last portion I zoom in a bit. You have to realize that zooming means that any unintentional movement of the camera results in big movement of the image. So practice the steadiness of your hand. Try to keep a comfortable position so your nervous body movements don't transmit from the monopod/tripod to your camera.
From one amateur to another, have fun working in 24p.
Friday, May 11, 2007
Making true 24p sources out of HV20 m2t
24p inside 60i with pulldown
This happens on TV a lot so you may not even notice this with your HDV.
24p with pulldown removed
You would pretty much have to be using a computer or some progressive display to notice the difference.
Introduction
Hi there! You're probably reading this because you want to convert your Canon HV20 (or whatever with 24F/P in 60i) footage to true progressive format prior to editing. Whew. Let me begin by saying not everyone needs to do this. If you're adding lots of special effects and resizing your output to a smaller HD (eg. 1280x720) it may matter because of "combing". Or simply because you like to see your frames individually as clear as possible. Maybe you are a film enthusiast and your final output needs to be its progressive best. Doing Inverse Telecine/Pulldown Removal (we'll call it IVTC now) will not compensate for bad video. It just removes the blur/ghost produced by that one interlaced frame every few seconds. Most people will not even notice. I barely notice it.
This IVTC process won't save you hard drive space because you need to generate large files with a lossless codec if you really want to preserve the bit-by-bit look. If you compress with WMV9 or XViD you're doing lossy editing which may lose more detail if you add in text effects or overlays. It's up to you. Maybe your audience won't notice. Call it an artistic device!
Anyway, you can still work with your raw m2t or dvr-ms to produce fantastic looking output. DVR-MS used by Windows Movie Maker is stored with WMV9 compression. That format does not allow interlace therefore it is automatically deinterlaced for you! If you just need something simple to share with friends and relatives you can recompress to WMV. Even Mac users should have a codec to read those! As for Linux, they can figure it out.
This process is technically involved. The open source software hasn't been glued together enough to be easy to use. Get one thing wrong and it may not work at all. If you have no patience for this, stick with Microsoft's Movie Maker or stay with interlace. If you need to do this for a living then go spend the extra cash to buy Cineform's software. They cost a pretty penny but they simplify this process and do some extra high end stuff.
Have I knocked some sense into you? No? Oh well, then read on.
The Farnsworth plus Sillyman Process
Forgive me Farnsworth, whoever you really are, for I am about to immortalize your name with your own process. His original process is posted here. He listed down the tools you needed. They are all free, from extracting the m2t to performing IVTC and then rendering to an intermediate edit format. The only non-free part is where you actually start using an NLE. Unless you're using VirtualDub/Windows Movie Maker you probably had to buy an HDV capable editor.
Here's an overview of the workflow with the improvements I've made:
1) Extract m2t using HDVSplit (NLEs like Vegas can do this too)
2) Run DGIndex and fixavs.pl via go.bat to identify the progressive and interlaced frames and save it to a d2v file. Generate an MPA file for audio to go with it. Create an Avisynth (AVS) file with instructions to use the d2v and mpa with the correct audio delay.
3) Load the AVS file into VirtualDubMod and select your compression format. Then Save As to an AVI file.
4) Load your new AVI file to your choice of NLE for editing. Then render to your desired format.
5) Delete or archive the source files that you no longer need.
Getting Step 1-3 To Work
We'll only cover Steps 1 to 3 in this process. 4 to 5 is all yours.
A) Download the Software
ActivePERL 5.8
HDVSplit 0.77 Beta
VirtualDubMod 1.5.10.2 All inclusive
Avisynth 2.57
DGIndex 1.49 RC2
TIVTC v1.01 plugin ~search TIVTC
MPASource plugin ~search MPASource
MSU Lossless Codec
Lagarith 1.312 Codec
Huffyuv 2.2.0 Codec
Farnsworth plus Sillyman 24p scripts
B) Install HDVSplit 0.77 Beta (you don't have to if your NLE already makes m2t with scene splitting)
C) Create a directory called 24p (anywhere you'd like)
D) Decompress VirtualDubMod 1.5.102 into that 24p directory.
E) Decompress dgmpgdec149rc2.zip into that 24p directory; RENAME IT to dgindex
F) Go to the dgindex directory and look for DGDecode.dll; COPY THAT to c:\Program Files\Avisynth 2.5\plugins
G) Open TIVTCv101.zip and COPY the TIVTC.dll to c:\Program Files\Avisynth 2.5\plugins
H) Open mpasource_25_dll_20040109.zip and COPY mpasource.dll to c:\Program Files\Avisynth 2.5\plugins
I) Right-click msu-ls-codec.exe and Run as Administrator (For Vista -- XP you can run as normal) and follow the prompts to install
J) Decompress Lagarith_1312.zip and RIGHT-CLICK INSTALL lagrith.inf; you can delete the decompressed files aftewards
K) Decompress Huffyuv 2.2.0 and RIGHT-CLICK INSTALL huffyuv.inf; you can delete the decompressed files afterwards
L) COPY the go.bat, template.avs, and fixavsdelay.pl into the 24p directory
M) Double click on the activeperlxxx.msi file to install and follow the default options
Your 24p directory should look something like this:
D:\Capture\24p>dir
 Volume in drive D is DATA

 Directory of D:\Capture\24p

05/12/2007  08:48 AM    DIR          .
05/12/2007  08:48 AM    DIR          ..
05/11/2007  07:01 PM    DIR          dgindex
05/12/2007  07:03 AM             1,526 fixavsdelay.pl
05/11/2007  10:55 PM               173 go.bat
05/12/2007  08:48 AM             5,576 README-YouSillyMan.txt
05/11/2007  10:57 PM               117 template.avs
05/09/2007  09:35 AM    DIR          VirtualDubMod_1_5_10_2_All_inclusive
Your plugins directory should look something like this:
C:\Program Files\AviSynth 2.5\plugins>dir
 Volume in drive C is OS

 Directory of C:\Program Files\AviSynth 2.5\plugins

05/11/2007  07:07 PM    DIR          .
05/11/2007  07:07 PM    DIR          ..
07/05/2005  08:04 AM             7,129 colors_rgb.avsi
05/07/2007  10:53 PM           192,512 DGDecode.dll
12/24/2006  05:12 AM            24,576 DirectShowSource.dll
01/09/2004  08:55 PM           135,168 mpasource.dll
12/24/2006  05:12 AM           112,640 TCPDeliver.dll
02/19/2007  05:52 PM           456,192 TIVTC.dll
How To Use The Script
A) Run HDVSplit to extract all your m2t scenes (in this example we'll assume D:\Capture)
B) Start -> cmd , this will launch a command shell
C) Go to your 24p directory where go.bat is found (in this example we'll assume D:\Capture\24p)
D) in the command shell type "go D:\capture" -- USE ABSOLUTE PATHS; DGindex will launch once per m2t file
Sample filenames generated:
05/08/2007  06:11 PM        35,451,392 CaptureTemp_0023.m2t
05/12/2007  09:01 AM           492,626 CaptureTemp_0023.m2t_ MPA PID 814 DELAY -236ms.mpa
05/12/2007  09:01 AM               208 CaptureTemp_0023.m2t_.avs
05/12/2007  09:01 AM             1,800 CaptureTemp_0023.m2t_.d2v
05/12/2007  09:01 AM               214 CaptureTemp_0023.m2t_fixedaudio.avs
E) There will be two sets on avs file for each m2t. You want the one that says xxxx_fixedaudio.avs
F) Run VirtualDubMod and drag the xxxx_fixedaudio.avs into the open window
G) Video -> Compression (pick a lossless one like LSU or whatever you like)
F) File -> Save As (you can use fast recompress since or full processing, doesn't matter), give it a file name
G) open that file in your NLE and begin editing
H) When you're all done you can delete the files as you see fit
The procedure is still rough but its a good start. Here is some sample output.
UPDATE1
Some have had trouble following the instructions for various reasons. I've put together the pieces that don't explicitly disallow bundling. Hopefully this link is still valid when you find this.
http://www.sendspace.com/file/d71x3y
The contents have an installme.bat. Run that to create a c:\capture directory. Inside the 24p directory specified in E-H and J are done. You still have to do the rest manually but it will help get you started if you run into errors.
You may want to read the thread that spawned the above "patch" at http://www.dvinfo.net/conf/showthread.php?t=91500&page=2
UPDATE2
Steve Szudzik consolidated the above process and the improvements in update1. You can find his exe and procedure at http://www.szudzik.net/vegas/scripts/HV20Pulldown.html. Therefore the procedure outlined above is mostly for reference now. If you have problems with Steve's method look to the components that made it work.
fixavsdelay.pl+go.bat, this is replaced by Steve's HV20Pulldown.exe
#!c:\perl\bin\perl.exe
# You can install ActivePERL 5.8 to parse this for you
# This file is fixavsdelay.pl Version 1
# Parse AVS files in directory with proper delay
# by Mike Dulay -- http://yousillyman.blogspot.com
# This code is released under GPL to align with the spirit of the code this works with.  It's free and open source, okay?  Just use it and abuse it.  But any mistakes from here on are you own! :-)

# My template.AVS:
#vid=MPEG2Source("__vid__")
#aud=MPASource("__aud__").delayaudio()
#audiodub(vid,aud)
#TFM(d2v="__vid__")
#tdecimate()

# My go.bat
#COPY template.avs %1
#FOR %%f IN (%1\*.m2t) DO dgindex\dgindex.exe -if=[%%f] -FO=0 -OF=[%%f_] -AT=[%1\template.avs] -EXIT
#FOR %%f IN (%1\*.m2t) DO perl fixavsdelay.pl %%f


sub mstos {
    my $ms = $_[0];
    #preserve the "-" sign if present
    my $sign = "";
    $sign = '-' if ($ms=~/^\-/);
    $ms =~ s/^\-//;
    my $secs = sprintf("%.3f", ($ms/1000));
    return $sign.$secs;
}

my $filename = $ARGV[0];
open(AVSFILE,"<$filename\_\.avs");
open(OUTFILE,">$filename\_fixedaudio\.avs");

foreach my $line () {
  if ($line =~ /DELAY /) {
      my $subline = $';  # part of string after word DELAY
      $subline =~ /ms\.mpa/; # part of string between delay and ms.mpa
      my $delaystring = $`;
      my $seconds=mstos($delaystring);
      $line =~ s/delayaudio\(\)/delayaudio\($seconds\)/;
      print OUTFILE $line;
 } else {
 print OUTFILE $line;
 }
}
close(AVSFILE);
close(OUTFILE);

__END__
rem COPY template.avs %1
FOR %%f IN (%1\*.m2t) DO dgindex\dgindex.exe -if=[%%f] -FO=0 -OF=[%%f_] -AT=[template.avs] -EXIT
FOR %%f IN (%1\*.m2t) DO perl fixavsdelay.pl "%%f"
template.avs, this was my version
vid=MPEG2Source("__vid__")
aud=MPASource("__aud__").delayaudio()
audiodub(vid,aud)
TFM(d2v="__vid__")
tdecimate()
farnsworth.avs, this was Farnsworth's original which Steve also uses as a base
v=MPEG2Source("__vid__")
a=MPASource("__aud__")
audiodub(v,a)
TFM(d2v="__vid__")
tdecimate()
DelayAudio(-0.222)
UPDATE3:
Here's a reference to the HV20 forum where Farnsworth first posted his method.
http://www.hv20.com/showthread.php?t=218&page=13
Eugenia Loli-Queru also posted improvements to Steve's documentation (it's great how the improvements keep rolling).
http://eugenia.gnomefiles.org/2007/07/13/canon-hv20-24p-pulldown/
Wednesday, May 9, 2007
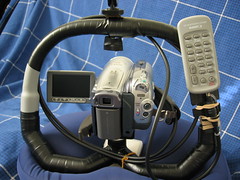
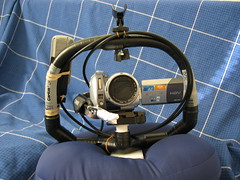
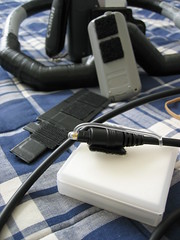
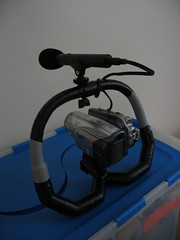
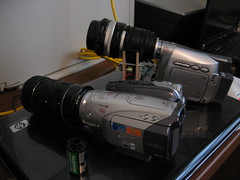
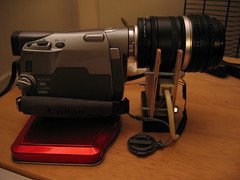
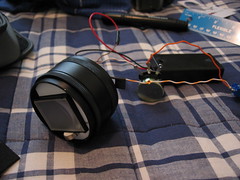
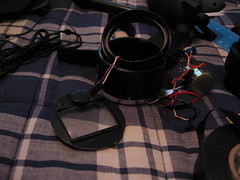
HV20 Non-LANC controller
Now that I've built a figrig its great for moving around. But starting or stopping the recording means having to let go with one hand. Unfortunately, there is no LANC available for the HV20. Not to be deterred I built one based on an earlier idea.
Parts
1 Canon WL-D85 Wireless Controller
1 Toslink optical cable
1 Pack of Sticky Back Velcro
1 Roll of Electrical Tape
1 Plastic fork/spoon/knife (flat handle)
1 Flat plastic/credit card
4 rubber bands
1 strip of aluminum foil
Tools
1 Pair of Scissors
Start by testing the principle. The HV20 sensor is that smoke colored plastic on the lower right side (left if you're looking directly at it) of the lens. Get a fiber optic cable like a Toslink (aka SPDIF optical) cable and line up the HV20's controller with one side of the pickup. Point the other end of the cable at the sensor. You can control the camcorder from behind! The trick is getting the controller and cable to line up. Same thing with the sensor and the other end.
The Controller Mount
I start by cutting up an old plastic card into 2/3 and 1/3 pieces lengthwise. The 1/3 piece is used as a spine and extends out the top by an inch to be a fastener for the cable. Wrap the pieces together with electrical tape.
Do a dry fit of the cable and the controller to see how best to line them up. This will determine where to place the sticky velcro. Attach two pieces of the loopy velcro pad to the back of the controller. Put two corresponding pieces on the mount. Dry fit the cable again. Based on where the body of the optical head lies, cut out two tabs on either end of the mount with your scissors. This will be where the rubber bands hold on to the cable.
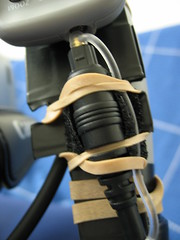
Dry fit with the cable and some rubberbands. The objective is to keep the LED on the controller aligned with the cable head. Knowing its position, remove the rubber band and tape a hook-pad of velcro to the mount. Then wrap the loopy pad to the body of the cable head. Both ends should now line up nicely but the mount tends to flex up and down. You can get a handle from plastic spoon or fork for an extra spine to the mount. This will prevent the mount from flexing the head and LED into misalignment.
Now you have a working controller. Test it by pointing the other end to the camcorder's sensor. We're halfway there.
Mounting the Controller
We'll need to be more creative here depending on what's holding the HV20. A monopod/tripod will have to be setup a bit differently from my figrig type. Use your imagination.
There are a few simple rules to follow. Do not bend the cable sharply or the glass may break. It is flexible and sturdy but not if it gets snapped. Rubber bands make good fasteners. Twisties will do too. Plastic tie-downs will work but be careful when you need to cut them off.
Reflecting the Beam
Keeping the covers to the optical cable helps diffuse the beam. Otherwise it is so narrow you have to be aimed almost perfectly for the sensor to make it work. With the covers on, the sensor will pickup the signal up to 30-degrees off angle when stuck point-blank. Or on angle from about three inches away to the front. Having the cable face the camera may be inconvenient like with my figrig. So I routed mine from beside the camcorder.
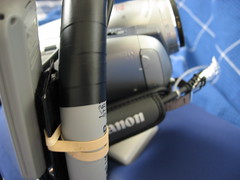
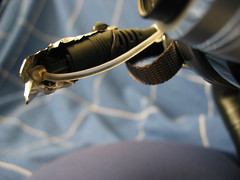
I routed the cable through the handstrap which hangs it at about a 45 degree angle to the sensor. On the optical head I attach some shiny aluminum foil. Crumpled a bit to form a concave mirror it will scatter the beam toward the sensor. This seems to work quite well even if the head moves.
References:
http://www.dvinfo.net/conf/showthread.php?t=16934
Parts
1 Canon WL-D85 Wireless Controller
1 Toslink optical cable
1 Pack of Sticky Back Velcro
1 Roll of Electrical Tape
1 Plastic fork/spoon/knife (flat handle)
1 Flat plastic/credit card
4 rubber bands
1 strip of aluminum foil
Tools
1 Pair of Scissors
Start by testing the principle. The HV20 sensor is that smoke colored plastic on the lower right side (left if you're looking directly at it) of the lens. Get a fiber optic cable like a Toslink (aka SPDIF optical) cable and line up the HV20's controller with one side of the pickup. Point the other end of the cable at the sensor. You can control the camcorder from behind! The trick is getting the controller and cable to line up. Same thing with the sensor and the other end.
The Controller Mount
I start by cutting up an old plastic card into 2/3 and 1/3 pieces lengthwise. The 1/3 piece is used as a spine and extends out the top by an inch to be a fastener for the cable. Wrap the pieces together with electrical tape.
Do a dry fit of the cable and the controller to see how best to line them up. This will determine where to place the sticky velcro. Attach two pieces of the loopy velcro pad to the back of the controller. Put two corresponding pieces on the mount. Dry fit the cable again. Based on where the body of the optical head lies, cut out two tabs on either end of the mount with your scissors. This will be where the rubber bands hold on to the cable.
Dry fit with the cable and some rubberbands. The objective is to keep the LED on the controller aligned with the cable head. Knowing its position, remove the rubber band and tape a hook-pad of velcro to the mount. Then wrap the loopy pad to the body of the cable head. Both ends should now line up nicely but the mount tends to flex up and down. You can get a handle from plastic spoon or fork for an extra spine to the mount. This will prevent the mount from flexing the head and LED into misalignment.
Now you have a working controller. Test it by pointing the other end to the camcorder's sensor. We're halfway there.
Mounting the Controller
We'll need to be more creative here depending on what's holding the HV20. A monopod/tripod will have to be setup a bit differently from my figrig type. Use your imagination.
There are a few simple rules to follow. Do not bend the cable sharply or the glass may break. It is flexible and sturdy but not if it gets snapped. Rubber bands make good fasteners. Twisties will do too. Plastic tie-downs will work but be careful when you need to cut them off.
Reflecting the Beam
Keeping the covers to the optical cable helps diffuse the beam. Otherwise it is so narrow you have to be aimed almost perfectly for the sensor to make it work. With the covers on, the sensor will pickup the signal up to 30-degrees off angle when stuck point-blank. Or on angle from about three inches away to the front. Having the cable face the camera may be inconvenient like with my figrig. So I routed mine from beside the camcorder.
I routed the cable through the handstrap which hangs it at about a 45 degree angle to the sensor. On the optical head I attach some shiny aluminum foil. Crumpled a bit to form a concave mirror it will scatter the beam toward the sensor. This seems to work quite well even if the head moves.
References:
http://www.dvinfo.net/conf/showthread.php?t=16934
Wednesday, May 2, 2007
The PVC figrig semi-complete
Its noticeably more stable than using one hand or one hand while moving a monopod. But some shock is still transferred by the casual step. If you pay attention to the nose it does move when you go up/down steps or move quickly.
As soon as I can jury rig a laser pointer I'll try various weights to balance it some more.
As soon as I can jury rig a laser pointer I'll try various weights to balance it some more.
Mixing 60i and PF24 sources on a 35mm IVTC project
Since the HV20 had this wonderful PF24 mode I've been going made looking for the best way to generate 3:2 pulldown to make progressive source files. Then I realize that my other camera is a 60i only device. So was there a point to converting to 23.976 fps before editing?
If there is, I haven't discovered it yet. The time spent doing pulldown could have been done editing. With mixed sources there will be a deinterlace and frame rate conversion to be done anyway. By mixing it together the final output won't have such a jarring difference between cameras. Is this right? I don't know.
If there is, I haven't discovered it yet. The time spent doing pulldown could have been done editing. With mixed sources there will be a deinterlace and frame rate conversion to be done anyway. By mixing it together the final output won't have such a jarring difference between cameras. Is this right? I don't know.
Sunday, April 29, 2007
Building a PVC Figrig for Camcorder Stabilization
I've been looking for a compact way to stabilize my walking and 35mm footage. The monopod is great for static shots but sways too much at the head while walking. A DIY steadicam is a bit too heavy to be taking around casually. My search led me to a DIY figrig by shygantic which in turn led me to the more compact version by webstr.
My parts list was a bit different from the original. I'm short a coupler. Only after building it did I realize that his had a 90 degree elbow and a 45 degree elbow whereas mine used two 90 degree elbows.
My Part list
2 x 1/2" SCH40 90-degree PVC Conduit Elbow (Electrical)
1 x 1/2" SCH40 90-degree PVC elbow with threaded side outlet (Plumbing)
6 x 1/2" SCH40 45-degree PVC elbow Slip-type (Plumbing)
8 x 1" of 1/2" SCH40 PVC (Plumbing -- usually sold in 10")
1 x 1/2" SCH40 Threaded Plug (Plumbing)
1 x 1-1/2" Wing screw (-20 Machine screw)
1 x 3/4" SCH40 (-20 Machine screw)
1 Bogen/Manfrotto 3299 Quick Release Adapter
Tools and Consumables
1 roll of electrical tape
1 roll of teflon tape
1 drill with 1/4" bit
1 mitre box
1 hacksaw
1 can of PVC cement and primer
1 Mask
1 Pair of Gloves
The hardest part to find was the 1/2" 90 degree elbow with side outlet. I had to search three Home Depot and two Lowes stores to find it. And it was by chance since it was mixed in with the 3/4"x3/4"x1/2" kind. If you're stuck with that, you can probably use reducing bushings to bring it down to 1/2". Or you could scale bigger so all the parts are common.
You cut the pipe to make 1" connectors then dry fit the rig to your liking. I used a marker to draw lines indicating alignment. Once happy with that I started gluing (actually solvent welding -- primer first, glue next) from the center of the design out. This helps keeping the entire thing balanced. If you've not worked with PVC cement before, make sure to do it in an open spot with a mask on. Use gloves. You apply the purple primer on one both connecting sides to melt the PVC. Then the glue is applied on top of both. Fit the parts together and hold for a few seconds. Clean up the excess goop with cardboard or plastic. Make sure the alignment is correct while its still soft. The cement dries quickly so glue half the connector to each fitting in sections. The rig will smell for days and isn't fully dried until 24 hours later.
The last piece to go in was the top handle bar and the threaded plug. The 1/4" drill bit was used to make a hole in the plug and handle bar for screw mounts. The 3/4" screw went to the threaded plug for the QR adapter. Teflon was used around the plug thread to help put it in. It doesn't go all the way in! Halfway is good enough as long as it is secure. The 1-1/2" wing screw went to the handle bar for the microphone base.
What about the electrical tape? PVC gets brittle under long term exposure to sunlight. So I wrapped it in electrical tape for that NOT PLUMBING look.
References:
Shygantic figrig http://www.flickr.com/photos/shygantic/129121710/
Webstr figrig http://www.flickr.com/photos/wbstr/357975178/
Friday, April 20, 2007
How to adjust your 35mm Footage
Most of my footage comes out washed out or too dark. Blame it on my amateur manual skills. But it turns out all is not lost. To get the missing detail out of the footage there are tools.
NLEs and programs such as Virtual Dub and Avisynth allow you do to color curves and color correction. Eyeball and S-curve, adjust the gamma, and the contrast then you're on your way. Of course these values change once you recompress to a different format (e.g. when you upload to Youtube).
Sites with Tips:
http://www.wideopenwest.com/%7ewvg/tutorial-1.htm
Tuesday, April 17, 2007
Static Adapter Version 2
I broke my vibrating motor while disassembling it from the 52mm tube. I had constructed a ground glass holder by cutting up a plastic key card and slipping it into an empty 52mm filter ring. Mounted backwards it mated with a 52mm-to-52mm macro coupler. Unfortunately it didn't work because there wasn't enough play to vibrate the ground glass. Incidentally, the test tape was somehow lost as I changed tapes. And later I had an accident that broke one of the small gauge wires on the motor. I get knocked down, but i get up again.
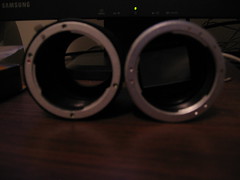
So I took the 52mm filter plus mount I made for the failed vibrating experiment and moved it to the 57mm. Incidentally a 52mm filter fits snug in that macro tube so it was easy to position and get to the right distance. Add a +10 singlet macro and some step down and I was in business. This was also the perfect chance to try my brand spanking new camcorder.
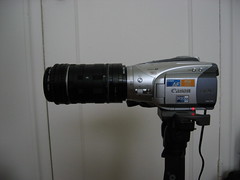
Say hello to the Canon HV20. It's a small HDV camcorder with a progressive CMOS sensor. The little wonder reminds me of my Canon Elura which was one of few early MiniDV with a progressive CCD. Against all advise, I hooked up my Static Adapter to both the ZR200 and HV20. Their resolution and light gathering abilities are different. I just wanted to see how bad the grain could be with this unit. One other thing changed on the V2, I have a +10 singlet close-up macro (not an achromat). The shot was done indoors on a cloudy day.
Lens: 50mm Nikon Series E f/1.8
DOF Adaptor: YouSillyMan35 v2 Static, Nikon F3 Type D
Camera: Canon HV20, 1/2.7" Single CMOS progressive
Original Mode: HDV24PF, TV-48
Recompression: WMV9 1920x1080 30fps progressive, 6Mbps
File Size: 71.24MB
http://www.megaupload.com/?d=9G3EUNE5
Lens: 50mm Nikon Series E f/1.8
DOF Adaptor: YouSillyMan35 v2 Static, Nikon F3 Type D
Camera: Canon ZR600, 1/6" Single CCD interlaced
Original Mode: DV interlaced, automatic
Recompression: WMV9 720x480 29.97fps interlaced, 4Mbps
File Size: 45.84MB
http://www.megaupload.com/?d=3N8MNZ2B
So I took the 52mm filter plus mount I made for the failed vibrating experiment and moved it to the 57mm. Incidentally a 52mm filter fits snug in that macro tube so it was easy to position and get to the right distance. Add a +10 singlet macro and some step down and I was in business. This was also the perfect chance to try my brand spanking new camcorder.
Say hello to the Canon HV20. It's a small HDV camcorder with a progressive CMOS sensor. The little wonder reminds me of my Canon Elura which was one of few early MiniDV with a progressive CCD. Against all advise, I hooked up my Static Adapter to both the ZR200 and HV20. Their resolution and light gathering abilities are different. I just wanted to see how bad the grain could be with this unit. One other thing changed on the V2, I have a +10 singlet close-up macro (not an achromat). The shot was done indoors on a cloudy day.
Lens: 50mm Nikon Series E f/1.8
DOF Adaptor: YouSillyMan35 v2 Static, Nikon F3 Type D
Camera: Canon HV20, 1/2.7" Single CMOS progressive
Original Mode: HDV24PF, TV-48
Recompression: WMV9 1920x1080 30fps progressive, 6Mbps
File Size: 71.24MB
http://www.megaupload.com/?d=9G3EUNE5
Lens: 50mm Nikon Series E f/1.8
DOF Adaptor: YouSillyMan35 v2 Static, Nikon F3 Type D
Camera: Canon ZR600, 1/6" Single CCD interlaced
Original Mode: DV interlaced, automatic
Recompression: WMV9 720x480 29.97fps interlaced, 4Mbps
File Size: 45.84MB
http://www.megaupload.com/?d=3N8MNZ2B
Saturday, April 14, 2007
How not to do a Vibrating Ground Glass
The static is fine for web videos but leaves much to be desired for full DV. At low light like indoors shooting the grain shows up around the edges. So I try to convert the simple static to a full vibrating ground glass. Unfortunately I am not successful yet.
Notice something wrong? The adapter was a full centimeter short! One of the spacers is too short. This wreaked havoc with the infinity focus.
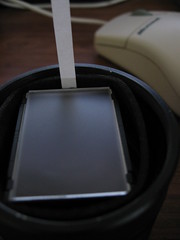
I started with the 52mm tube and cutout a plastic card. I carefully cut a rectangle the size of the Nikon Type D for mounting the ground glass. I tried it alone inside of the tube as a static but it wasn't stable. So I try using a 52mm filter in reverse and that held the ground glass well. Trial fitting the motor I found that there wasn't much room to mount it vertically as it should. So just for kicks I try it horizontal. It doesn't work.
Not one to give up, I sacrifice some of the focus screen's visible area by mounting the motor vertically against the fastening tab on the Nikon Type D. The vibrations are more quiet but I can't see the grain moving. There isn't enough play in the rectangular cutout nor the plastic card to allow the grains to move.
I ask the kind folks at DVInfo Alternative Imaging what kind of stupidity I've delved into and I'm told that my arrangement wouldn't work. The horizontal was moving in the wrong direction. It was also loud because it was turning the card into a diaphragm. Meanwhile my vertical was too tight on the tube to allow the movement necessary to blur the grain. Just for kicks I'm taking the vertical setup to the seaport for some test shots.
Notice something wrong? The adapter was a full centimeter short! One of the spacers is too short. This wreaked havoc with the infinity focus.
I started with the 52mm tube and cutout a plastic card. I carefully cut a rectangle the size of the Nikon Type D for mounting the ground glass. I tried it alone inside of the tube as a static but it wasn't stable. So I try using a 52mm filter in reverse and that held the ground glass well. Trial fitting the motor I found that there wasn't much room to mount it vertically as it should. So just for kicks I try it horizontal. It doesn't work.
Not one to give up, I sacrifice some of the focus screen's visible area by mounting the motor vertically against the fastening tab on the Nikon Type D. The vibrations are more quiet but I can't see the grain moving. There isn't enough play in the rectangular cutout nor the plastic card to allow the grains to move.
I ask the kind folks at DVInfo Alternative Imaging what kind of stupidity I've delved into and I'm told that my arrangement wouldn't work. The horizontal was moving in the wrong direction. It was also loud because it was turning the card into a diaphragm. Meanwhile my vertical was too tight on the tube to allow the movement necessary to blur the grain. Just for kicks I'm taking the vertical setup to the seaport for some test shots.
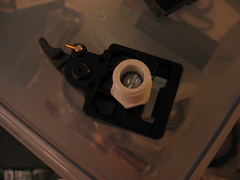
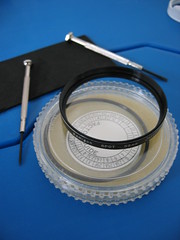
Converting a 57mm Macro Tube to a 58mm
To convert my macro tube I elected to use spacer 1. To prepare the pieces the spacer was cleaned with soapy water then dried. Same for the filter ring after the glass and retainer were removed. Once dried I started mixing the two part epoxy. I used JB Weld for its strength and 15 minute setting time. Anything from 15 to 30 minutes is good. The faster epoxies tend to become brittle especially with exposure to sun. And never use cyanoacrylate glue such as Super Glue/Mighty Bond/Krazy Glue. The fumes from this glue is the same used by forensic investigators to lift fingerprints from evidence. Keep those away from optics.
The finished product ready to accept 58mm
The epoxy will be a soft goop but shouldn't run. Make sure its as close to a 1:1 ratio. Now apply the epoxy with a disposable blade or a credit card to the male thread of the spacer. Apply a small amount to the inner thread of the filter. Be careful not to get any on the inner thread of the spacer and the rear thread of the filter. Use a stable surface to put the two together. Press and turn to even it out.
Epoxy will probably be spilling out the inside and the side. Use a blade or credit card to scrape the excess out. If any get on a thread, use a wet towelette or your fingers to wipe (make sure you wash your hands before eating!). On a stable flat surface, hold the assembly to the light to make sure they are lined up. Cleaning may protrude part of the filter outside of the spacer's ring. Just push slightly in whatever direction to adjust.
Set the assembly aside in a warm undisturbed place overnight. After the setting time has elapsed it's ready.
Friday, April 6, 2007
Other ways of aligning the Groundglass
When using a paper strip make sure it's stiff enough to stand
Use a toothpick or a strip of paper marked with 46.5mm to adjust the distance of the ground glass.
Thursday, April 5, 2007
The Right Way to Remove Glass from a Filter
I was ready to go destroy the glass on this sacrificial 58mm filter. Then looking at it I wondered how they go it in there in the first place. It certainly wasn't using glue.
There is a retaining ring that holds the glass to the filter. On either side is a tab. The tabs are where you apply pressure and turn the ring counter clockwise. This unscrews the retainer. To remove it I used the art foam-screw driver technique. Placing the filter on the foam prevents skidding. I then use one of my little fingers to press the ring down on the foam to lock it in place. With a set of flat head precision screw drivers I rotate the ring counter-clockwise. This unlocks the ring and allows me to use one screw driver from then on.
If you don't want to do those contortions, find yourself a pair of circlip pliers that can go to the proper diameter. McMaster-Carr calls them retaining clip pliers. There is also a spanner version which are locking. They have two teeth like a protractor that will hold the tabs as you spin it. Speaking of which, a drawing compass may be easier to find.
Wednesday, April 4, 2007
Limitations of The Static Adapter
Besides the grain, the other thing you will notice immediately with a static adapter is how much cleaning you have to do. Even very small pieces of lint or dust can ruin your image if it lands on either the ground glass or condenser. I made the mistake of using the pad end of a lenspen to clean the ground glass and now there is this little black spec embedded in one of the very small pits. Use air, brush, and microfiber cloth to clean your groundglass.
The dust speck is on the lower left quadrant when rotated 180 degrees. Two more fibers of lint next to it which got muddled by YouTube's compression.
The static adapter is small and light. But the attached lens isn't. I'm using a Non-AI 50mm Nikkon S-C which is about as heavy as the entire camcorder. It must be conceded that the ZR200 is a featherweight as camcorders go, but that totally makes balance different. Learning to frame and hold the image takes a bit of practice. And did I mention that the camcorder's image stabilization won't help you because the SLR lens is doing the work? Live and learn. But it's fun. While taking this video a passerby asked me "Is that a camera or video? How much does it cost?" My answer, "I just put it together myself."
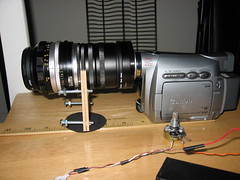
Making a support system
The whole assembly is front heavy. The new center of gravity makes handling the camcorder awkward especially for such a small unit. It also puts a lot of stress on the camcorder's lens thread. There are support systems that can be purchased commercially but I want to give it a shot myself.
Parts:
1) Plywood
2) 1/4-20 machine screws
3) Glue
Tools:
1) Mechanical pencil
2) Metric ruler
3) Screw drivers
4) Dremel minisaw / Handsaw
5) Boxcutter
I start out with the leftover plywood from the spinner project. Plywood is easier to work with than plastic unless you are able to make your own molds or have access to a CNC machine. Cardboard is another possibility but that isn't as sturdy.
First I measure the distance from camcorder base to bottom of the 58mm tube assembly. Then get an additional measure up to the middle. Then I draw two rectangles of the dimensions I want on the plywood. Now for the decision.
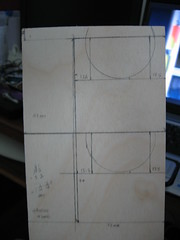
I want to make this unit a vibrating gg later on so I need room to mount switches and batteries. So I decided on a two piece holder braced with screws, hence the two rectangles. Within a box defining the bottom of the assembly to the middle I trace the outer diameter of the tube.
I cut the two pieces out with a saw. Its a rough cut which needs to be sanded even (I prefer to use dremel to get it close then handsand for accuracy). For the half-circle cut out, I use a cutting blade and dremel cutting tool to make a rough cut. Then I sand it down with the rotary sander by hand until it's even. Before you go off to do this, make sure you are away from your optics and either have a mask or open air. Lots of sand dust is produced from power sanding! It helps to have some sort of vise to hold the wood or drill screws into the two pieces to sand them together.
Parts:
1) Plywood
2) 1/4-20 machine screws
3) Glue
Tools:
1) Mechanical pencil
2) Metric ruler
3) Screw drivers
4) Dremel minisaw / Handsaw
5) Boxcutter
I start out with the leftover plywood from the spinner project. Plywood is easier to work with than plastic unless you are able to make your own molds or have access to a CNC machine. Cardboard is another possibility but that isn't as sturdy.
First I measure the distance from camcorder base to bottom of the 58mm tube assembly. Then get an additional measure up to the middle. Then I draw two rectangles of the dimensions I want on the plywood. Now for the decision.
I want to make this unit a vibrating gg later on so I need room to mount switches and batteries. So I decided on a two piece holder braced with screws, hence the two rectangles. Within a box defining the bottom of the assembly to the middle I trace the outer diameter of the tube.
I cut the two pieces out with a saw. Its a rough cut which needs to be sanded even (I prefer to use dremel to get it close then handsand for accuracy). For the half-circle cut out, I use a cutting blade and dremel cutting tool to make a rough cut. Then I sand it down with the rotary sander by hand until it's even. Before you go off to do this, make sure you are away from your optics and either have a mask or open air. Lots of sand dust is produced from power sanding! It helps to have some sort of vise to hold the wood or drill screws into the two pieces to sand them together.
Friday, March 30, 2007
Not All Macro Tubes are Created Equal
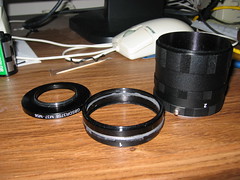
To SLR users a macro tube is just what it is, probably. Unfortunately that doesn't help me. I bought two different tubes in Ebay hoping one of them would have a standard 58mm thread. Sadly one of them had an odd 52mm male thread while the other used a 57mm female thread! Not being one to give up I scoured the internet for ways to use these tubes. And the way was the reverse macro coupler. Sure it made the project more expensive with each new part but it salvaged an otherwise difficult situation.
Solution for 52mm
This macro tube was manufactured in India and is sold by a US supplier from Ebay. At $10 plus shipping it was interesting to try. Upon receipt it was confirmed to have a 52mm thread diameter. The threads between spacers is female on the back and male on the front. If you think about a UV filter, you would screw it in with the filter's back thread.
This makes the inner diameter 52mm facing the wrong way. Fortunately 52mm is a standard size. To mate this with the camcorder I bought a 52mm-52mm reverse macro ring. This ring is male 52mm on both sides. SLRs use this to hook up a lens in reverse format to use as a magnifier. From the macro ring, any XXmm to 52mm step up or YYmm to 52mm step down ring can mate with the camcorder lens.
52mm is pretty narrow for focusing screen. The Nikon F3 Type D focus screen barely fits inside the tube. With some art foam I was able to get the screen to fit snug. This pretty much makes the tube suitable for a static design. Note that the tube isn't smooth. The outer diameter of the tube is still 58mm and the inner approximately 55mm. But on either end of each spacer is a 52mm inner thread. Think of a built in step down! Putting a vibrating motor or a holder will be a challenge due to small tolerances.
Source: Ebay - camera_accessories (keywords: nikon tube)
* Spacer 1 6mm
* Spacer 2 12mm
* Spacer 3 24mm
* Outer diameter 58mm
* Inner diameter 52-55mm (ridges)
* Thread diameter 52mm
Solution for 57mm
Perhaps the chinese manufacturer has a 1mm variance. I was really hoping the tube had a standard 58mm thread. But no it had to be 1mm short. Externally the tube is still 58mm. But the connecting threads (male receiving, female connecting) are too short to allow hooking up any sort of reverse ring, filter, or step ring. 57mm isn't a standard filter size. There were filters of this size in the history of single reflex cameras (ancient history in tech terms) such as the Bay 7.5L (maybe sometimes B57) but these don't end in a standard size thread nor are they easy to find. Short of machining one the next best thing is to adapt the thread using a sacrificial 58mm filter or step-up ring.
I go with the filter. Though I have various XXmm to 58mm step up (you can't use a step down because there's not enough contact space) I don't want to get stuck should I need to put a macro in later. So off to Ebay I went to seek the cheapest one with a metal ring. Then off the the hardware store to buy some strong epoxy. I'm still waiting for the filters to arrive, but I plan on removing the glass (minimize internal reflections) before gluing it on.
Source: Ebay - goshotcamera (keywords: nikon macro tube)
* Spacer 1: 9mm
* Spacer 2: 16mm
* Spacer 3: 30mm
* Outer Diameter: 58mm
* Inner Diameter: 54mm
* Thread Diameter: 57mm
So where can you find a tube with a standard 58mm thread? The ones sold from Hong Kong and China are probably a hit or miss deal. I even called Fotodiox and asked a sales representative (they were very accomodating!) to try their tubes if they had 58mm thread and they were just a hair short as well.
Saturday, March 24, 2007
Outdoor Test with the Static
The static showed its grain when used outdoor with iris at full open.
When the static is complete it needs to have all the openings sealed from light and dust. A brace also needs to be made as the camcorder's threads probably can't carry the weight of the lens assembly.
When the static is complete it needs to have all the openings sealed from light and dust. A brace also needs to be made as the camcorder's threads probably can't carry the weight of the lens assembly.
Friday, March 23, 2007
Making and Testing the Static
This was a really simple build with better results than the spinner that is still half finished. I can't take that much credit for it. I think the condenser on the Nikon Type D has a lot to do with it.
Parts
Tools
I took the macro tube and stacked it with 1, 2, 3. In ring number 3 I put a ring of art foam to cover the space. Then another layer of art foam was wrapped around the focus screen so pushing it in braced the screen into the tube. With this macro tube stacked this way, the edge of the ring threads comes to about 46.5mm! Simple as that. Hook up your choice of Nikon lenses and setup the camcorder. Zoom in and press record.
Cheated a bit. I ordered the wrong macro tube so the thread was female rather than male. And its ring was 52mm female threaded rather than 58mm male threaded. So I'll need a macro reverse coupler and a step-up ring to hookup to the camcorder
The video was extracted from DV and then rotated 180 degrees. It was recompressed with ffdshow to fit in youtube size. The static grain isn't as obvious because of the downscaling (720x480 16:9 to 360x240 4:3). The washed out colors has more to do with the shooting environment and the single CCD camera. It was shot indoors during a rainy day.
Parts
- Nikon Lens
- Nikon Macro extension tube
- Nikon F3 Type D Focus Screen
- Reverse Macro coupler for tube (for later)
- Step-up adapter for camcorder (for later)
- Art Foam
Tools
- Ruler
- Boxcutter
- Lenspen
I took the macro tube and stacked it with 1, 2, 3. In ring number 3 I put a ring of art foam to cover the space. Then another layer of art foam was wrapped around the focus screen so pushing it in braced the screen into the tube. With this macro tube stacked this way, the edge of the ring threads comes to about 46.5mm! Simple as that. Hook up your choice of Nikon lenses and setup the camcorder. Zoom in and press record.
Cheated a bit. I ordered the wrong macro tube so the thread was female rather than male. And its ring was 52mm female threaded rather than 58mm male threaded. So I'll need a macro reverse coupler and a step-up ring to hookup to the camcorder
The video was extracted from DV and then rotated 180 degrees. It was recompressed with ffdshow to fit in youtube size. The static grain isn't as obvious because of the downscaling (720x480 16:9 to 360x240 4:3). The washed out colors has more to do with the shooting environment and the single CCD camera. It was shot indoors during a rainy day.
Testing the Spinner
The trick to getting the ZR200 to focus is to have something bright in front of the lens. The grain on the Maxell CD is a good point for the camcorder to focus. Then set it to manual mode. Zoom in to frame the good part of the image.
The grain on the spinner is very visible when static. It is still visible while spinning slowly. In this test, the disk was spun by hand. The 35mm lens was a Nikkon Series E 50mm f/1.8 prime. The pulsating of the image is my fault. I had not mounts so the camcorder was held an inch from the ground glass by hand.
The grain on the spinner is very visible when static. It is still visible while spinning slowly. In this test, the disk was spun by hand. The 35mm lens was a Nikkon Series E 50mm f/1.8 prime. The pulsating of the image is my fault. I had not mounts so the camcorder was held an inch from the ground glass by hand.
Thursday, March 22, 2007
Macro might not be needed afterall
I am being silly again. Testing the ZR200 with various zoom settings and manual focus proved that the 28mm lens on the camcorder is able to focus on objects very closely. The trick was to have something with good contrast in front of the ground glass while adjusting the zoom and focus.
No Achromat Just Yet
The seller for my binoculars ran out of stock. Might as well, I just learned that there is some color casting from those front lenses. Sourgrapes? Probably. On a brighter note, I have some parts coming in for the second prototype which will be a static/vibrating gg based around a Nikon F3 Type D focus screen.

This focus screen is thicker than the Canon Ee-A that other builders use because it has a built in condenser. The condenser is a plano-convex (PCX) lens that magnifies the amount of light that goes to the focus screen. That's a lot of big words! Not that I know a lot about optics, I'm still learning what it all means. I should explain it some more on this blog as each concept is understood by me. But the PCX simply means that the image that gets on the focus screen is brighter. More light to the focus screen makes it easier for the camcorder to record an image.
The Type D focus screen is, incidentally, a favorite for astrophotography. And it is supposedly has such a fine grain that it could be used static. The static design is based roughly on the aldu35. This was a parallel development for the spinning agus35. The aldu35 was later improved by having the gg vibrate to blur the grain.
All this talk is making me anxious. I sure hope that +10 Macro comes in soon so I can have prototype 1 working.
Tuesday, March 20, 2007
Searching for Macros
And so begins the search for a magnifier. The terms Macro, Close-up, and Diopeter get thrown around. The filters that screw on to the lens is usually called a close-up lens. Sometimes a Macro. Diopeter (literally means power of magnification) is rarely seen. But if you get the chance you want an achromatic close-up. The folks at DVInfo.net talk about custom built 72mm achromats for HD work. Others talk about really expensive +7 Century Optics achromatic close up but they're not entirely happy with it. I've heard of Hoya +10 (AC) close ups which some people consider okay for SD work but its not cheap either.
What's all this lingo and how does it matter? First of all lets think of what a macro does. It's a magnifier so the camcorder's lens can focus on a object closer that it normally can. The power has to be high enough so we can get the magnifier closer to the ground glass which is our subject. So we want a +7 or +10 power (or diopeter) magnifier. You can stack magnifiers like a +3 and +4 but this causes recordable light to be lost. We want to keep as much light as possible so I decided on a +10.
Speaking of light, that's what the coatings are for. The better the coating the more light is allowed through the filter. That's why some lenses are cheap and some are very expensive. The expensive ones supposedly let 99% of light to go through. Less expensive multi-coated ones let 97% and so on.
When you magnify an image you multiply flaws. This includes an effect called distortion and chromatic abberation. If you take a regular handheld magnifier you'll notice that the image is sharp in the center and gets stretched out as you get to the edges (distortion). The colors also gets a bit off like a badly tuned TV (ghosting). Now if you have a big enough magnifier you may be able to compensate for distortion by focusing on the center sweet spot. For the ghosting, most recommend to get an achromatic diopeter. This is a two lens magnifier that cancels out this effect. Since those are expensive and we want to experience build it yourself, we're going to have to make compromises.
Just to be able to test, I ordered a +10 Closeup made by Bower. Bower is supposedly at par with Hoya standard coating filters. Since I'm using an SD camera it should be good enough. But for later I really want to try an achromat. So I go buy cheap binoculars.
Say what? Yes, binoculars. The front lenses taken out and facing each other can be used to build an achromat. All you need is a holder and some glue. It'll make a nice challenge. At the end of the day all this experimentation maybe just a bit shy of buying 1 tested commercial product. But that's 1 versus many. And the comparison is great for learning.
References:
http://en.wikipedia.org/wiki/Achromat
http://www.angelfire.com/ca/erker/closeups.html
http://www.jetsetmodels.info/tutorials.htm
Monday, March 19, 2007
You need a Macro!
Sharp focus was fairly easy to eyeball on the spinning gg and the Nikon F3 Type D focus screen. Just move it closer or further until you get a sharp image with the lens set to infinity. The tricky part was getting the camcorder to focus on the ground glass. What the human eye can see sharply does not translate to what a single CCD camera can see. It's a very small target (maybe half an inch high and an inch wide of good image) even for the small 28mm lens on the Canon ZR200. Using the Canon S410's video mode wasn't any good since there is not way to engage macro and photo at once. I don't know too many camcorders with a macro mode so I probably will need a set of macro lenses.


But this doesn't stop me from conducting experiments. The spinning disk really is good for a nicer image. And the distance from lens to ground glass matte side was about 40mm. That's 6.5mm shorter than advertised for the Nikon F mounts. Maybe I'm doing something wrong? Fortunately its all adjustable. (Update: I was being silly measuring from the back of the lens to the ground glass. 46.5mm is measured from the F mount to the matte side of the ground glass. So my flange focal length to focal plane is really 46.5mm give or take!)
The spinner is half-built. I have to look for Macro lenses to help the camcorder out. At first I thought to just go out and buy 28mm close-up (I don't mind chromatic aberation at this point). But then I thought that a macro lens like any other magnifier will look warped unless I get a bigger lens. I don't know if that's right but it probably won't hurt. At least I hope not.
Saturday, March 17, 2007
Progress and Frustration
I have a half working prototype now. Since its night and indoors the furthest my infinity focus can go is the door. I don't know if this is it or something else, but instead of the 46.5mm distance I was expecting for F-mount I had to use 40mm distance between back of lens to frosted side of ground glass.
There was trouble focusing on the ground glass while zoomed in. The human eye can resolve the detail but the Canon ZR200 and S410 would just record points of light. Maybe I need a macro or an achromatic diopeter. But that will have to wait. I can't even prop the device up right now for lack of ballast and screws.
I was hoping that I wouldn't need a macro (I also hear the term relay lens -- could this be the generic term) because my lens was less than 43mm.


There was trouble focusing on the ground glass while zoomed in. The human eye can resolve the detail but the Canon ZR200 and S410 would just record points of light. Maybe I need a macro or an achromatic diopeter. But that will have to wait. I can't even prop the device up right now for lack of ballast and screws.
At wide-angle, you can focus on a subject as close as 1 cm (0.39in.).
- Canon ZR200 manual
- Canon ZR200 manual
I was hoping that I wouldn't need a macro (I also hear the term relay lens -- could this be the generic term) because my lens was less than 43mm.
After carefully drilling the center and pilot holes I set the circle cutter to 2cm. Control was difficult at best when cutting three stacked boards. The result was a poorly controlled cut that was too wide to put the mounting screws. I had enough board left over to make a patch panel but that messess up the even alignment of my screws. DIY is full of challenges.
The Right Tools
You can't do the job right without the tools.
* Precision Philips #00 screwdriver
* Cutting Tools: Handsaw, Rotary Tool/Drill, Box cutter
* Sandpaper
* Metric Ruler with metal edge
* Eye Protection

I had to buy the philips #00 screwdriver to remove the screws from the camera body. Fortunately the local Ace Hardware sold it in singles since I already had toolkits with other sizes. For cutting plastic and plywood, choose your poison. I have a Dremel XPR 400 with a circle cutter to make my circle cuts. It's also possible to do the job with a box cutter if you don't mind taking a while to cut through plywood. I would have used particle board but I couldn't find any. At one point I considered using carton but I was worried my screws wouldn't hold on that material. It would still work with glue but I want to prototype first. The sandpaper is good for removing burrs on wood and plastic. As for the Metric ruler, its just easier to deal with millimeters than fractions of an inch for precision work. The eye protection is standard but shouldn't be ignored!
* Precision Philips #00 screwdriver
* Cutting Tools: Handsaw, Rotary Tool/Drill, Box cutter
* Sandpaper
* Metric Ruler with metal edge
* Eye Protection
I had to buy the philips #00 screwdriver to remove the screws from the camera body. Fortunately the local Ace Hardware sold it in singles since I already had toolkits with other sizes. For cutting plastic and plywood, choose your poison. I have a Dremel XPR 400 with a circle cutter to make my circle cuts. It's also possible to do the job with a box cutter if you don't mind taking a while to cut through plywood. I would have used particle board but I couldn't find any. At one point I considered using carton but I was worried my screws wouldn't hold on that material. It would still work with glue but I want to prototype first. The sandpaper is good for removing burrs on wood and plastic. As for the Metric ruler, its just easier to deal with millimeters than fractions of an inch for precision work. The eye protection is standard but shouldn't be ignored!
Friday, March 16, 2007
Lenses and Mounts
I chose to go Nikon by recommendation. The F-Mount has been around a long time. Lenses are fairly easy to find.
Lenses
Most people start with a prime lens (as opposed to telephoto/zoom and wide lenses). A lens from f/2.0 to f/1.4 (lower is better) is considered fast . The 50mm f/1.8 prime lens is most common and should be available from Ebay and various camera stores used. If you're lucky you can buy a complete vintage film SLR camera with a good prime lens for cheap (<$50). There are f/1.2 and f/1.0 lenses but these are very old discontinued lenses that fall in the category of legend and luxury. When buying a lens its important to make sure there are no scratches or fuziness. If the lens needs cleaning or ever had fungus then its no good. As for the funny acronyms such as NAI, AI, AIS, etc. If it says F-mount somewhere and says manual it's good for our purposes. If the age indicated is 1977 or later you should be confident. The variations refer to how the mechanism control focus. We won't be using any of those functions. Unless you are a wiz at disassembling SLRs there's little chance of every using autofocus mechanism on these cameras. So go cheap and simple.
Mounts
We have to mount the camera lens to our aparatus somehow. There are many options for getting hold of an F-mount.
Personally I like to use screws more than glue. Glue is tricky to adjust because I work slow. So I bought an old circa 1979 Canon EM. It had a 50mm f/1.8 Series E lens and the four screw F-mount. I may have to supplement the screws with glue later on but that only makes the job easier. Since my first prototype will be a spinner I don't need the fancy tube style adapter.
References to Lenses and Mounts
http://www.nikonlinks.com/unklbil/bodylens.htm
http://www.photoethnography.com/ClassicCameras/Lens-F.html
http://rick_oleson.tripod.com/index-153.html
http://www.nikonlinks.com/unklbil/nomenclature.htm
Update
Another alternative for F-Mount:
Nikon part number 2717, K3 Female Nikon Bayonet F-Mount - for Custom Applications
Lenses
Most people start with a prime lens (as opposed to telephoto/zoom and wide lenses). A lens from f/2.0 to f/1.4 (lower is better) is considered fast . The 50mm f/1.8 prime lens is most common and should be available from Ebay and various camera stores used. If you're lucky you can buy a complete vintage film SLR camera with a good prime lens for cheap (<$50). There are f/1.2 and f/1.0 lenses but these are very old discontinued lenses that fall in the category of legend and luxury. When buying a lens its important to make sure there are no scratches or fuziness. If the lens needs cleaning or ever had fungus then its no good. As for the funny acronyms such as NAI, AI, AIS, etc. If it says F-mount somewhere and says manual it's good for our purposes. If the age indicated is 1977 or later you should be confident. The variations refer to how the mechanism control focus. We won't be using any of those functions. Unless you are a wiz at disassembling SLRs there's little chance of every using autofocus mechanism on these cameras. So go cheap and simple.
Mounts
We have to mount the camera lens to our aparatus somehow. There are many options for getting hold of an F-mount.
- Cannibalize the F-mount from a Camera Body
- Cannibalize the F-mount from an Adapter (like a C-mount to F-mount adapter)
- Use a rear Nikon lens cap
Personally I like to use screws more than glue. Glue is tricky to adjust because I work slow. So I bought an old circa 1979 Canon EM. It had a 50mm f/1.8 Series E lens and the four screw F-mount. I may have to supplement the screws with glue later on but that only makes the job easier. Since my first prototype will be a spinner I don't need the fancy tube style adapter.
References to Lenses and Mounts
http://www.nikonlinks.com/unklbil/bodylens.htm
http://www.photoethnography.com/ClassicCameras/Lens-F.html
http://rick_oleson.tripod.com/index-153.html
http://www.nikonlinks.com/unklbil/nomenclature.htm
Update
Another alternative for F-Mount:
Nikon part number 2717, K3 Female Nikon Bayonet F-Mount - for Custom Applications
Thursday, March 15, 2007
The Wily Frosted Maxell CD-R ground glass
Supposedly there are nicely frosted fake CDs in the 25pk Maxell CD-R cakeboxes. Maybe maybe they were more abundant in 2004. But it's now 2007 and I had a hard time finding one.
I used to have those frosted plastic disks that protected CDs/DVDs in a cake box. Just last year I threw out my empty spindles with those non-crystal blanks. Little did I know that I might want them a year later. In desperation I tried to sand my own ground glass from some crystal DVD-R blanks. Not having any 1500 grit wet dry sandpaper handy, I used a sheet of metal sandpaper that was lying around from repairing some car rust. This was Norton brand from the Home Depot with no grit rating on it. It was marked "fine" which I guess is about 100-200grit. Apparently, "fine" wasn't fine enough as I tested my poor groundglass. The light loss was horrendous.
So I scoured several stores to find the elusive ground glass (gg). Walmart had 25pk Maxell CD-R but these were the 'printable' type. Looking through the top I couldn't tell if there was a frosted there. This was not to be mistaken for the CD-R Pro with its gold surface and no frosted cd. There were several cakeboxes by Memorex, Sony, TDK, and Imation but none of them had it. Once I got fooled by the milky translucent look of the Memorex 15 pack so learn from my mistake. The best bet is to look for silver top CD/DVD. The clear cakebox is an even milky color but the frosted blank will make it look rough and spotted. It will look like it has dust particles around it but its somewhat evenly spaced and distributed.
Best Buy, Circuit City, CVS, RiteAid, Radio Shack, Target and the local supermarket saw me inspecting every brand they had. Even among Maxell brands you must beware. I think the trick is to find a place with old stocks of CD-Rs. So I went to a lonely FYE near a huge Barnes and Noble. In a corner mixed in with white and blue-green 50pk Maxell CD-Rs was one cakebox of its older stock. Instead of the 56x, I grabbed the 40x all green 50pk Maxell CD-R box. The cover was a bit dusty so I had to really examine the top against the light. Seeing the small white dots and bumps told me it had a frosted CD.
Back home there was a cheap Durabrand CD player. Little did it know its life as a portable entertainment device was coming to a close.
The beginning of the Depth of Field experiment
To record our field games I bought a cheap Mini-DV camera. We were going to make a nice group video to commemorate the year and I thought it would be nice to do film-look with shallow DOF. So I read up on how to do it, and bought a bunch of Neutral Density filters to control the f/stops. But we never got time to try it since we were busy running around the game field. It didn't help that the camcorders pulled double duty as helmet cam recorders.
Anyway I never got to try the filter technique but still went ahead with the video. Some lucky angles and amateur composition took out most of the distracting elements in the image. Queue in a good story and dramatic soundtrack to top it all off. The video was done but not as nice as we want it.
Now we're embarking on a new endeavor. We're setting up video reviews of game gear so I'm back at the DOF question. My brother has been using DSLRs and is pretty good at it. He pointed out 35mm DOF adapters from M2. From there I backtraced it to the Agus35 documented in dvinfo.net. Yippee! Another topic for my evil experiments! Soon I shall flood the world with exceedingly bad and cheesy videos!
References:
http://www.dvinfo.net/conf/forumdisplay.php?f=70
http://www.mediachance.com/dvdlab/dof/index5.htm
http://members.chello.nl/a.schultzevspierenburg/wax/wax2.htm
http://www.jetsetmodels.info/news.htm
What's This?
This blog is my notebook for all sorts of little projects. I'm in a a do-it-yourself phase. Last year I built helmet cameras (can't stop with one) and pneumatic cannons (more than 1 as well). For this part of 2007 I'm looking into 35mm Depth of Field. I'm going to hook it up to every imager I have and see if a film look will work nicely for my videos.
Subscribe to:
Posts (Atom)