Parts:
1) Plywood
2) 1/4-20 machine screws
3) Glue
Tools:
1) Mechanical pencil
2) Metric ruler
3) Screw drivers
4) Dremel minisaw / Handsaw
5) Boxcutter
I start out with the leftover plywood from the spinner project. Plywood is easier to work with than plastic unless you are able to make your own molds or have access to a CNC machine. Cardboard is another possibility but that isn't as sturdy.
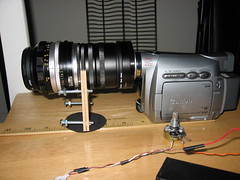
First I measure the distance from camcorder base to bottom of the 58mm tube assembly. Then get an additional measure up to the middle. Then I draw two rectangles of the dimensions I want on the plywood. Now for the decision.
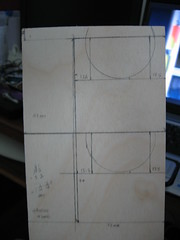
I want to make this unit a vibrating gg later on so I need room to mount switches and batteries. So I decided on a two piece holder braced with screws, hence the two rectangles. Within a box defining the bottom of the assembly to the middle I trace the outer diameter of the tube.
I cut the two pieces out with a saw. Its a rough cut which needs to be sanded even (I prefer to use dremel to get it close then handsand for accuracy). For the half-circle cut out, I use a cutting blade and dremel cutting tool to make a rough cut. Then I sand it down with the rotary sander by hand until it's even. Before you go off to do this, make sure you are away from your optics and either have a mask or open air. Lots of sand dust is produced from power sanding! It helps to have some sort of vise to hold the wood or drill screws into the two pieces to sand them together.
No comments:
Post a Comment