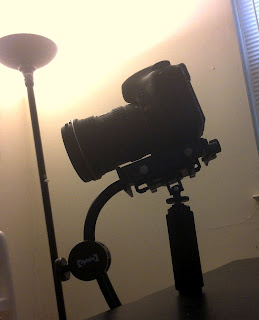
Saturday, September 1, 2012

Netgear GS108T and Synology DS412+ Set Up Link Aggregation

The Process
First step is to power down the DS412+ and anything else in your network that needs re-cabling. Make sure to leave at least 2 ports free for the DS412+. Find the two Gig-E ports on the back of the DS412+ and hook it up to any two ports on the Smart Switch. In my case I made the Netgear GS108T the main switch and hooked it up to my Wireless router that connects to the Internet. A second Netgear switch is hooked up by a long cable to another room where the desktop and Xbox reside. Across the living room to the TV I have my old Linux NAS hooked up. Power everything up and make sure everything is communicating as is.


Configure Link Aggregation on GS108T
The GS108T comes with Windows software called SmartControlManager. Alternatively you can access it via a Web Browser if you know its IP address. How do you find it's address aside from using Smart Control Manager? My LAN uses the Wireless router as a DHCP server. So I logged on to that device and listed all DHCP client. Using the names I found the GS108Tv2. A quick browser launch and an http:// got me to the admin page.

From here I choose the Switching tab which immediately shows me the active ports. Follow LAG -> Basic -> LAG Configuration. Select the LAG1 entry (since this is an 8-port switch, you can have a maximum of 4 LAG). This is where it confused me at first. Selecting LAG1 populates the entry fields above it. Enter a Description, I chose "diskstation" then LAG Type of "LACP". Hit Apply.


Move to the LAG Membership option. From here select LAG1 then choose the ports the DS412+ was hooked up to. There is a yellow button that is equivalent of Select All. This works only if you have one device running LAG on this switch. Hit Apply.

That's it for the GS108T. Now to enable it on the NAS.


Configure Link Aggregation on Synology DS412+

Login to DSM on the DS412+ then launch Control Panel -> Network -> Network Interface -> Create
x IEEE 802.3ad Dynamic Link Aggregation -> Next
The two LAN ports should be automatically selected -> Next
x Get network configuration automatically (DHCP) -> Apply
You will now find one connection called Bond 1 rather than two LAN connections. Congratulations, you now have Channel Bonding turned on! The two LAN ports will now start working as a team for all incoming and outgoing requests.
Give it a stress test if you like.

Friday, August 31, 2012

Synology DS412+ and My New Storage Network

Background
Back in 2000 I purchased my first DV camcorder. It was a Canon Elura that used MiniDV tapes. Every tape extracted about 13GB. Even today that's still a lot. You can easily fill hard drives with that much storage. At first I only edited the extracted clips then deleted them leaving the original footage on MiniDV tape. Tape was good for archival if you didn't mind waiting for the re-extraction.

Years have passed and I've switched to CF card which can't be used for archival. I have BD burners to make archival copies but I've found that old footage is still best kept close by. Initially I built a RAID desktop for keeping just photos. Then when .5 and 1TB drives became common I started keeping video on those drives.

It was initially going to be temporary but I've found that family events like birthdays and such required me to dig out years old footage so I never went back to delete them.   I got used to it. Fast forward to today and it's time for a major upgrade. My second generation self-built NAS is an Zotac IONITX-A-U running Ubuntu and SAMBA hooked up to USB drives via a hub. It's decent but not very fast. All those drives were formatted in NTFS and maxed out at 25MB/sec to read.    That's enough for viewing a few pictures here and there.  But I wanted something closer to what direct SATA gave me.


Picking the Synology DS412+
I originally considered the Drobo, Netgear and EMC/Iomega NAS.    I read the reviews and the Synology brand kept coming up.   Two things sold me on the thing: (1) Simplicity of DSM (2) Raw performance.  It was the fastest of the more reasonably priced NAS on the market.

Here's a sample of it's performance in my current configuration.   

Robocopy Write test
Copy from internal SATA drive to Diskstation via 1Gbps port (82.5MB/sec)
 
------------------------------------------------------------------------------

               Total    Copied   Skipped  Mismatch    FAILED    Extras
    Dirs :       132       131         1         0         0         0
   Files :      9460      9460         0         0         0         1
   Bytes : 233.776 g 233.776 g         0         0         0    14.5 k
   Times :   0:48:33   0:48:22                       0:00:00   0:00:11


   Speed :            86472142 Bytes/sec.
   Speed :            4947.975 MegaBytes/min.

   Ended : Wed Aug 22 13:49:27 2012

Robocopy Read test
Copy from Diskstation to internal SATA via 1Gbps port (99.98 MB/sec)
------------------------------------------------------------------------------

               Total    Copied   Skipped  Mismatch    FAILED    Extras
    Dirs :       132       131         1         0         0         0
   Files :      9461      9461         0         0         0         0
   Bytes : 233.776 g 233.776 g         0         0         0         0
   Times :   0:40:03   0:39:54                       0:00:00   0:00:09


   Speed :           104837993 Bytes/sec.
   Speed :            5998.878 MegaBytes/min.

   Ended : Wed Aug 22 14:38:14 2012

Not bad is it? That's over half the bandwidth of a directly hooked up SATA drive. Given that a single gigabit ethernet port has a theoretical cap of 125MB/sec its looking pretty good.   What this allows me to do is pick out some footage, pictures and music from the NAS and output to local USB and SATA drives.   It's the not the fastest configuration but while I'm doing quick edits in Sony Vegas on my laptop, the desktop could be rendering a composition in Adobe After Effects.

My current configuration
Synology DS412+ (paid link) with 4x Seagate 3TB 7200rpm drives with LAG enabled
ProRaid+ (paid link) with 4x Western Digital 2TB 5400rpm drives attached via SATA
ioSafe SOLO G3 Fireproof and Waterproof 3TB Hard Drive (paid link) for critical backups via USB 3.0
Netgear GS108T-NAS Prosafe 8-Port Gigabit Smart Switch (paid link) attached to 2x1Gigabit Ports on DS412+
Cyberpower 485AV UPS attached via USB


Hold your horses! What's that switch and UPS for you ask? The UPS gives the NAS a chance to do a proper shutdown should there be a power failure. The Smart Switch allows you to bond two ethernet ports together on the DS412+ but keep one IP address. A plain dumb switch would allow you to use the second port as a backup. But a Smart/Managed switch allows both to be used actively with a feature called Link Aggregation (LAG). A 1GigE port has a theoretical max of 125MB/sec but there is some waste in there that brings the real throughput much less. Those individual SATA devices in our previous tests could achieve 175MB/sec. Not to mention I have the ProRaid shared simultaneously as the DS412+'s internal volumes. I can't exceed the throughput of a single port for one transfer but I can have multiple devices and transfers at once each using either available port.  Effectively you can have a ceiling of 250MB/sec on all combined transfers.

Modest Simultaneous Device Test 
Can we prove that LAG is useful?  

(a) Copy from Leonovo W520 SATA to Diskstation via Wireless-G (35.37MB/sec write)
               Total    Copied   Skipped  Mismatch    FAILED    Extras
    Dirs :        40        38         2         0         0        12
   Files :       962       961         0         0         1         1
   Bytes : 125.429 g 125.425 g         0         0    4.39 m  226.63 m
   Times :   1:00:35   1:00:30                       0:00:00   0:00:05


   Speed :            37092186 Bytes/sec.
   Speed :            2122.431 MegaBytes/min.

   Ended : Wed Aug 29 22:31:54 2012
(b) Copy from Ubuntu IONITX-A-U NAS from USB drive via 1Gig-E (22MB/sec write)

(c) Copy from HPE-380T whole SATA HDD (74.97 MB/sec write)

               Total    Copied   Skipped  Mismatch    FAILED    Extras
    Dirs :       568       565         3         0         0         0
   Files :     13809     13809         0         0         0         0
   Bytes : 748.996 g 748.996 g         0         0         0         0
   Times :   2:51:04   2:50:30                       0:00:00   0:00:34


   Speed :            78613676 Bytes/sec.
   Speed :            4498.310 MegaBytes/min.

   Ended : Wed Aug 29 22:42:43 2012

Yes! 132MB/sec with three devices.   This is a write test which is a slower operation.  If I started multiple copies plus video playback I could probably use up more bandwidth.  Keep in mind that 125MB is a theoretical maximum for a single port.  The extra port allows other devices to access the NAS if one is fully saturated. 


A Hint on Adding a Share to your Libraries
You might be wondering how I was able to mount My Documents from the NAS.   It's a trick using symbolic links.

Start -> Command Prompt -> Right-click -> Run as Administrator

Microsoft Windows [Version 6.1.7601]
Copyright (c) 2009 Microsoft Corporation.  All rights reserved. 
C:\Windows\system32> mkdir \diskstation
C:\Windows\system32> cd \diskstation
C:\diskstation>mklink /d Pictures \\diskstation\Pictures
symbolic link created for Pictures <===> \\diskstation\Pictures 

From here you can go to Explorer -> Libraries -> Pictures -> Properties -> Include a Folder

Power Consumption
2.7 Watts plugged in for DS412+ with 4 ST3000DM001
17.3 watts powering up (button press)
45.9 watts powering up (spinning up)
62.2 watts peak powering up (blue flashing light)
44-46 watts powered up doing raid check
49 watts doing CrystalMark

Saturday, August 25, 2012

Mediasonic ProRaid and e-SATA without Port Multiplier

Good news everyone! The Lenovo W520 has an e-SATA port that didn't support port multiplier (tested with JBOD enclosures) but there are options for external RAID. I have on my desk a Mediasonic ProRaid+ HFR2-SU3S2FW enclosure. Unlike plain JBOD enclosures like the Thermaltake BlacX Duet or the Mediasonic ProBox series, this unit presents the drives as a single disk via built in hardware RAID.  Only if you run it on JBOD/Spanning mode do you need a port multiplier.


I have to confess, I didn't buy the ProRaid for the W520. It was meant to become an expansion unit to my NAS which didn't support port multiplier either. I'm thinking I should get another of these units or something from its family. Startech sell similar units though a bit more expensive.


I went with the Mediasonic 4-bay because it was cheaper and the good feedback from Amazon, Newegg and Synology forums.   The unit I purchased came with e-SATA, USB, FW400 and FW800 ports.   Another model skips the FW400 and FW800.

Attached to the W520's e-SATA port it is presented as "H/W RAID 5" device.   I didn't try changing the RAID type but I guess its name may vary according to the RAID selected.


Once connected it functions like any other disk which can be initialized then formatted.  Windows doesn't know or care that it is a RAID with four 3TB disks.   All it sees is an 8.353TB device.


Here is the same device attached to my SMB server.   It's hooked up to a non-port multiplier e-SATA port on a Zotac IONITX-A-U motherboard.   The operating system is Ubuntu 10.04 with support for NTFS volumes.  Disk Analyzer must be using base-10 math as the space reported is 9TB (3x3TB + 3TB parity).


Gotcha for First Initialization
Even after reading the manual it caught me unawares at first.  The unit will immediately flash the red H icon after spinup if a RAID setting has not yet been selected.   The instructions are explicit, hold down the mode button for 3 seconds until the RAID mode flashes.  Press mode several times to select the RAID type.  I chose RAID-5 in my case.  Then go to the back of the unit.  Remove the tab covering the RAID confirmation button next to the power plug.  Hold it down until it powers down.   Next time you power up the RAID mode is set.   The device will be uninitialized if the drives have never been used in that RAID mode before.  And any content will be lost once it has started up.


If the drives need to be migrated to another ProRaid unit, you're supposed to be able to use them in the same RAID mode.  The trick is to setup the RAID mode with the ProRaid empty.  As in, no drives should be inserted until it is RAID confirmed and powered down.


Performance Baseline
The ProRaid shows up as a SATA II (3.0Gbps / 384MB/sec) device.  Which is fine since the enclosure is meant for 3.5" mechanical hard drives.   Spindles will barely reach the limit of even SATA 1.0 (1.5 Gbps / 192MB/sec) bandwidth.


The above readings are with four ST3000DM001 SATA III (6.0Gbps) drives hooked up to my HPE-380T desktop.   The physical drives are hidden by the hardware RAID so S.M.A.R.T. info is rather limited.   Health status is readable for the array despite the screenshot.   What surprised me was how the RAID 5 peaked higher for sequential operation that Software RAID 0.   For all other operations types, RAID 0 still won as expected.


   Speed :            29480409 Bytes/sec.
   Speed :            1686.882 MegaBytes/min.

A Robocopy write test was much slower at 28.11 MB/sec. It seems a far cry from the Software RAID 0 setup previously tested.   But that's an apples to oranges comparison.   The CrystalMark test is still at odds at the above results.  I guess I'll take it as a low end baseline for ProRAID.  I'm not too disappointed since that's still faster than my Samba server which I use presently.   The source disk for the test contained thousands of photos, videos and sound files which were stock material for video editing.


Power Consumption
The ProRaid is supposed to power itself down when the host computer shuts down.   I tested it with my Lenovo W520, HP Elite 380T and Zotac IONITX-A-U but the unit did not power down while hooked up to either eSATA, USB 3.0 or USB 2.0.    Later I would discover that it would shutdown correctly on eSATA for a Synology DS412+.   I could have sworn the laptop and desktop were setup for AHCI mode on the BIOS of at least the HP.   This is something to research on the Mediasonic forum.

0.3 watts with power brick plugged in (Vampire Power)
28 watts average with disks at rest
36 watts average with disks operating
43 watts peak observed during spindown

I got those readings with a Kill-A-Watt EZ (paid link). My interest was in the peak reading so I could figure out which of my UPS would be able to take it. Happily my old Cyberpower 485VA (300 watt) unit had plenty of headroom for this.

Next up: Synology DS412+ and my new storage network

Tuesday, August 21, 2012

Software RAID with Seagate 3TB Disks and Windows 7


In an attempt to re-consolidate my data I've recently purchased four (4) 3000GB Seagate Barracuda drives. I use 3000GB rather carefully, that's what's written on the ST3000DM001 label. On Amazon it would say 3TB. If you're already aware of the decimal (used by marketing for Storage numbers) versus binary (what computers actually use) way of counting then you wouldn't be surprised that it formats to about 2794.39 GB for NTFS on every disk. These drives came preformatted in NTFS in the factory so it only takes a few seconds to initialize the drive in Windows as GPT then quick format with NTFS.

 Now why did I get these instead of Hitachi or Western Digital? They were the cheapest 3TB drives I could get ($149.91 at the time). These were 7200rpm. Plus they were $5 cheaper than even Western Digital Green drives. Also they were on the on Synology's compatibility list.

What about 7200rpm versus "Green" drives?
I have plenty of 5400/5900 rpm drives from several makes. These are decent enough in performance but the baseline is really the 7200rpm drive. In terms of power consumption, the slower drives don't appear to make a big impact in the numbers even I deal with. The Kill-a-Watt is reading 183-210 Watts used for my desktop plus four Barracudas running. With just the drives powered up these were showing 45-60 Watts. The UPS they are hooked up to account for 15 of those Watts. As for heat, well I'll give you that, the 7200rpm does run a bit hotter. But I'm eventually going to run them with a fan in a NAS/RAID setup. Besides, the "Green" drives, particularly WD Caviar Green, have been notorious for some problems coming back from sleep that make them go missing in some RAID configurations. WD even has disclaimer that their desktop drives are not warranted for Business Critical RAID. Which is a change now that Western Digital actually sells "Red" drives which are NAS approved. The 7200rpm models equate to the "Black" ones. And they have RE models that are Enterprise-grade.

Western Digital Caviar Green: 5400 rpm 
Western Digital Red: 5400 rpm (?)
Seagate Barracuda LP: 5900 rpm
Seagate Barracuda: 7200rpm 
Western Digital Caviar: 7200 rpm 
Hitachi Deskstar: 7200 rpm  


Are you sure these drives are reliable?
No, every drive is a gamble. What matters is whether or not you got a set of good drives in the batch. Also did your seller's carrier keep from throwing the thing around. Every manufacturer from Hitachi to Western Digital has had their share of bad history. I still remember losing 3 IBM "Deathstars" (sold to Hitachi, recently became Western Digital) some years ago. I've also had a mix of success with Maxtor (now Seagate) and Samsung (also now Seagate). And I'm very familiar with the RMA process for Western Digital, which is pretty good in convenience and turn around. They're all the same to me. I just need to have good backups and make my drives as reliable as possible. So the first thing I look at after price is comments on reliability. These ST3000DM001 actually have a firmware update released. The drives came with CC4B and the latest out there is CC4H.  

Patching the firmware
How did I know these drives came with CC4B? I read the label on the drive and checked Google for hits on "<model> firmware". That lead me to all sorts of threads, including a Synology DS412+ user that recommended upgrading to this version. The patch process is available in two ways, Windows executable and CDROM ISO. Well, that's not entirely accurate. Both of them boot up a Linux image which detects your drive through the motherboard's SATA chipset then patches them if valid. 

I've discovered the following caveats in the process:

  1. You need an Intel based CPU. It says so in Seagate's website. Also a user that tried an AMD CPU said that it didn't work for him. 
  2. The operation runs once per boot, though you could do multiple drives if they were all present on boot 
  3. It appears to ignore my JMicron based PCI e-sata card, so had to open up my desktop case and swap some drives around 
  4. Your Windows Disk 0 should either be empty, unformatted or be Windows boot device. One of my drives to be patched superceded the boot drive and I had to unformat the 3TB before Windows firmware patch stopped complaining. 

So if you have an AMD CPU, you might have to borrow another machine. If you've got a laptop, just hope that you have an eSATA port hooked up to a chip that is recognized by Seagate's software. If you're on a Mac or Linux then you should look into booting from ISO. And if you're running Itanium, Power, SPARC or PA-RISC ... well don't look at me!


Software RAID-0
Just for the heck of it, I wanted to try setting up these four drives as a Stripped Volume (Windows RAID-0).   I had a pair of Thermaltake BlacX Duet (paid link) hooked up to two separate e-SATA ports on a JMicron-based PCI card.    The disks were initialized as GPT to get a size >2TB.


Why a Stripe and not a RAID-5?   In Windows 7 you will notice that option is greyed out.  The OS-based RAID-5 is only supported in Windows Server versions.   Of course you can have hardware RAID or BIOS/driver-based RAID.


RAID-0 is supposed to be the fastest RAID setup for both read and write.  There is no fault tolerance in this setup, which is actually what I want in this case.   If any one of the drives fail the entire array fails.   I'd like to know pretty quickly that the entire set is working.

Baseline Tests
I wanted to use standard and free tools to stress the disks.   So I used Robocopy and CrystalDiskMark.


Above results from four ST3000DM001 SATA-III in a software RAID-0

This would represent the initial speeds I could reasonably expect from this array. When I use it in a RAID-5 NAS later on, I'm expecting it would be slower. This also helps me determine if I need to bother with link aggregation and a managed switch later on. The theoretical maximum of a gigabit Ethernet is 125MB/s. It should be slower than this in real use, about 111 MB/s according to a test by Tom's Hardware. So do I need < =43MB/s read or < =17MB/s write more out of this array?


One ST3000DM001 SATA-III by itself.

Tom's Hardware gives it an average sequential speed of 119.8 MB/sStorage Review tests have it in the middle of the pack.


Compared to a ST31000340AS SATA-II I've been using as a Render target

For the Robocopy test, I used a USB-3 source drive that I knew I can hook up to all my devices for comparative tests later. 85.74 MB/sec is my baseline.

   Speed :            89907202 Bytes/sec.
   Speed :            5144.531 MegaBytes/min.

Robocopy write test


The Burn In
Before feeding these drives into a hardware RAID I wanted to make sure they didn't break within the first few days.  My choice of tool was HDDScan with CrystalMarkInfo.   HDDscan would be left running overnight while I look at Load/Unload Cycle Count and temperature.   I wanted to know how hot the drives can get in operation.   Load/Unload Cycle Count is how many times the drive had to come of park.   An large (more than double-digit) increase means the drives are too aggressive in going to sleep.  This would make them unsuitable for RAID application.   Most drives are rated for a few hundred thousand in their life and park/unpark would mean a lot of wear in the drive mechanism which would lead to earlier failure.   The point of RAID is extra reliability, if your base reliability is compromised it can only do so much.


I test each drive individually in a JBOD setup. 55-degrees Celsius was the hotest any single drive ever got.   The room had an electric fan in a room in the 27-degree Celsius (81 degrees Fahrenheit) range.


Next up: Mediasonic ProRaid and e-SATA without Port Multiplier

Sunday, June 24, 2012

Tips for the Opteka Steadyvid Pro - Part 3

Why did this part take so long? I went on vacation with the Steadyvid Pro to see how it fared out in the real world. There were airplanes, minivans, inappropriate luggage, tour groups and wind.

It was okay. Not professional grade as the "Pro" would suggest. But at the price, that was far from my expectations.

The test videos were shot on with a pair of GoPro HD Hero 2 (paid link) in a 3D Hero Housing (paid link). It was mounted on a Giottos MH621 (paid link) to add weight before sticking it to the camera plate.


How to Fly
  • Use Two Hands
  • Wear the right footwear
  • Mind the inertia
  • Block the wind
  • Follow a subject
  • Be ready to re-balance each time you set it down
  • Keep smiling


  • Use Two Hands
    Above the handle is a notched piece of plastic for controlling pan. Opteka calls this the "thumb stabilizer." The best way to hold it with your dominant hand on the handle and your non-dominant thumb and index finger lightly holding the thumb stabilizer.


    As the video above will demonstrate, one handed and thumb only are the worst ways to hold the stabilizer. I find that side to side movement will cause it to pan on its own. That's why you need to use your index finger as well.

    Also when you tilt the handle from straight it has the tendency to rotate left or right. Having your fingers on the pan can counter that.

    Wear the right footwear
    A pair of good fitting rubber shoes are best. Practice with the pair you will be wearing for the shoot. Okay, I've worn flip flops and they're okay on flat ground. If you decide to go outdoors it's better to go with something where you can step smoothly and not transmit the shock to your arms. So forget the leather shoes if you can help it.

    Mind the inertia
    Ease into your movements and changes of direction when you can. The Steadyvid Pro is quite fussy to balance and when traveling on vacation you don't have a lot of time to setup. So I'd tend to use it less than perfectly balanced. That's where my 2 second drop time comes in. There's more "boating" when I change direction but I've taken it as a given.

    Block the wind
    All stabilizers work best in an isolated environment. If there is a wind you will want some way to break it by putting a person or structure to block the wind. You'll have to get creative on how to keep the subject in the picture and the the wind break out.

    Over at the Grand Canyon we had winds going at least 10mph. In those cases, I would use a choke hold and lightly grasp the bottom of the stabilizer's weight. It's a light touch to counter the wind.

    Follow a subject
    This is a trick I learned with non-stabilized shooting. Camera motion is less noticeable when the subject is also in motion. At least with the stabilizer the motion is less frequent.

    Be ready to re-balance each time you set it down
    It must be something with the screws used for the gimbal. During the horizontal drop test I find that something shifts even after tightening the silver bolts. I've asked at least one other user at DVInfo and the Steadyvid Pro tends to lose balance when you set it down. Somehow the unit isn't "tight". So be prepared to rebalance for each shot. If you can keep it in your hand between shots that would be best.

    I've accepted that the Steadyvid Pro is less than perfect, so I work with it. This unbalancing problem would be a showstopper for anyone than a casual user.

    Keep smiling
    When you're out on vacation, the stabilizer is going to get you a few looks. So smile!

    Sample Footage
    Here it is, the good and the bad. My suggestion, just look at the footage first. Then go back to the tips above and think whether the shot was technically good or bad. Put on your 3D glasses if you dare!


    You can compare this against shots made with the CMR Blackbird in previous post. They're comparable since both were taken only some weeks after learning how to use each stabilizer. Over time you get better.

    Monday, May 28, 2012

    Tips for the Opteka Steavyvid Pro - Part 2

    Balancing the Steadyvid Pro
    1. Strip camera to components to be flown
    2. Find the camera's weight
    3. Find the camera's center of gravity (COG)
    4. Mount camera to stage aligning for COG
    5. Mount the plate to have camera COG over gimbal
    6. Expand the stabilizer arch
    7. Attach the weights
    8. Use trim controls to adjust balance
    9. Adjust drop time
    Strip camera to components to be flown
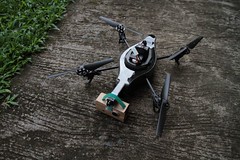
    Make sure to remove the camera strap and lens cap. You want the camera to be in a ready to shoot state before attempting to balance. If there is a fold out screen set it up. If the lens is not an internal zoom you'll want it locked into position.

    Find the Camera's Weight
    It might be a good idea to find out what your entire camera weighs. For camcorders it's not so hard. For DSLRs and Micro 4/3 it will vary on the lens attached. Some lenses will put the camera over the weight limit. Any accessories such as a sliding mounting plate will add to the overall weight. If you're worried by the accesories you've added use a kitchen scale (paid link). You only have three available weights standard with the Steadyvid Pro. Though the box says it should take 5 lbs (2.26 kg) that might be a stretch.

    Example Weights
    ItemWeight
    Canon 7D Body only842g
    Canon LP-E6 battery77g
    Canon 7D + Battery919g
    Giottos MH621244g
    Canon 70-200mm 4.0 + Filter + Ring924g
    Canon 100MM 2.8 Macro + Filter664g
    Sigma 17-50mm 2.8 EX HSM + Filter618g
    Tokina 11-16mm 2.8 + Filter593g
    Sigma 30mm 1.4 + Filter424g
    Sigma 30mm cap14g
    Canon 7D + Tokina 11-16 + Filter1512g
    Canon 7D + Sigma 30 + Filter1348g
    GoPro HD Hero 2 + 3D Hero Kit + Mount455g
    Using metric units for the precision

    Find the Camera's Center of Gravity (COG)
    My technique for finding the center of gravity is to mount the camera on a plate then roll it around a cylinder like a ballpoint pen. I do this for front to back and side to side. For the Canon 7D it's toward the EOS-mount and the right edge of the viewfinder port. This is your target for the gimbal.


    Another way is to support the camera with one hand and feel for the point where it starts to balance with your finger. Other cameras a regular enough shape that you could pretty much guess it should be the geometric center. The mounting hole for the camera is close to the camera's center of gravity, so it's always a good starting point.

    Mount camera to stage aligning for COG
    If we assume the gimbal is presently set for center of the stage, you want the camera COG right above the gimbal. The gross control for this is the mounting hole for the camera plate. There isn't an Opteka cookbook out there as of this writing. This will have to be accumulated by the user community. For this example I will be balancing the Canon 7D + Sigma 30mm + 67mm Filter. In the case of the 7D, I used the rear most position on the cross. This is not the optimal position but close enough. There is an even closer position which is the left rear hole. The trouble with that position was grip on the camera. Unless tightened enough there was a tendency for the camera to turn with heavier lenses. What matters is the camera stays in the position you set and is close enough that trim doesn't go out of range.


    Mount the plate to have camera COG over gimbal
    Now you should be able to mount the plate onto the stage. There is some left-to-right adjustment possible when mounting on the stage. Use the rear screw as a guide and compare it to the current gimbal position. Once your have the left-to-right position fairly close to the COG the next step is to deal with the arch. For the Canon 7D + Sigma 30mm + Filter I set the plate to align the left edge with the stage's left edge. This put the Camera COG on top of the gimbal.

    Expand the Stabilizer Arch
    To start with you will want the arch expanded to full. To do this turn the knob counter clockwise when you're facing its front. This arch has some flex to it which doesn't appear to affect it much in operation. But in build quality it's not quite a precise as the Blackbird I've had before.


    At maximum expansion the counterweight's effect is maximized. This affects drop time. Hold that thought, more on that later.

    Attach the weights
    You want just enough weight to balance the camera. Too little weight and the stage will tilt-up or dive down. Too much weight and the camera will be too bottom heavy making it erratic. You only have three weights. Only the Start and Middle weights are able to attach to the arch. The minimum counter weight is 81g using the Middle Weight. This might be a challenge for very light cameras. In those cases you may want to add weight to the camera using a sliding mount like the Giottos MH621 Quick Release Adapter with Short Sliding Plate camera mount (paid link).
    Counter Weights
    Start Weight 335g
    Middle Weights 162g (2x 81g)
    Finish Weight 78g
    
    Total 577g
    
    So how can we find how much weight to use? I start by mounting all the weights then recombining them experimentally. The arch should still be at maximum extension at this point. For the Canon 7D + Sigma 30mm + Filter I took away the Finish weight (Start+Middle = 497g). The camera remained upright with a slight tilt. When I took out even the middle weight the camera totally tilted up (Start = 335g). When I added back the Finish weight (Start+Finish = 413g) it wasn't enough to counter the camera's 1348g. So I settled with the Start+Middle weight as the correct combination for my rig.

    The intention is to have the rig slightly bottom heavy. Taking away weights or adding them back changes the COG of the entire rig. Notice the distinction! Before we were talking about the Camera's COG with respect to the gimbal. Now that you have the camera mounted you are trying to manage the Steadyvid Pro and Camera's overall COG. You want this to be slightly below the gimbal which acts as the fulcrum. Why? It has to do with Physics. Some people smarter than I am could probably work the math out for me. If you would like to take a shot here are some references:

    http://www.ehow.com/how_7525395_calculate-weight-balance.html
    http://www.school-for-champions.com/science/gravity_center.htm
    http://www.grc.nasa.gov/WWW/k-12/WindTunnel/Activities/balance_of_forces.html

    What I took away from this was the see-saw example. The heavier child, the camera in this case, has to be counteracted by the lighter child by varying either weight or distance. Now there could be cases where the camera is too heavy for the rig. My Canon 7D + Sigma 17-50mm 2.8 + Filter + Giottos MH621 could be balanced static but was too sensitive in motion. The Opteka website doesn't sell the weights separately on their catalog. You might have to get creative with washers to get more granularity.

    Use Trim Controls to Adjust Balance
    Now there is the infuriating part. I would find a sturdy table with empty space underneath. Merlin and WSCALTERs alike can sit on the handle when the camera is fairly close to balanced. With this you can use both hands to practice balancing. Once you get used to it, you should be able to balance it one handed while holding the camera with your dominant hand.


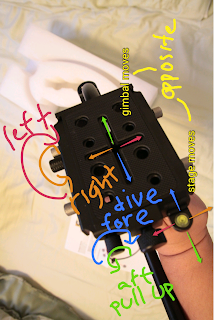
    Keep and eye on the bubble level. If your camera has an electronic level that would be even better. For this exercise we stick to the standard equipment, hence the bubble level. If the bubble is to the right, you need to roll left a bit. Use the knob on the stage's side and twist clockwise to move the bubble left. The bubble might also be slightly back, use the knob on the rear and twist clockwise to move the bubble forward. Alternate between knobs until you get the bubble center. Move the arch out of center then let it fall to confirm it will sit center. Once you have a good balance tighten the silver locking bolts on the sides and bottom of the stage. You are almost there. This is what they call static balance.

    One thing I don't like about the trim knobs is they tend to stick. I have to periodically check the gimbal to see if it's moving. The Blackbird was much smoother and precise. I'm comparing a Kia to an Audi here. Just letting you know.

    When first learning to make adjustments, you should use whole rotations until the stabilizer leans in the opposite axis. Then dial it back. Over time the number of twists start to become intuitive. If you look inside the stage you will find it is manipulated by long screws. The reason for the stickiness is friction between the locking nut and the stage. This may wear down over time making it easier to move even with the silver locking bolts tightened. For alignment of the gimbal by sight, on the bottom the space between the silver bolts is center. On the side, the silver bolts are fixed to the sliding stage. When the rear silver bolt is close to the rear end of the groove you are at maximum aft.


    Now pick up the handle and lift the rig from the table. It may get a bit squirrely then tilt in some odd direction. Adjust any major tilting with the same technique as you had. Now we need to work on dynamic balance and drop time all at once.

    Adjust Drop time
    If you move your hand left to right, then front to back you may notice it acting like a boat in rough seas. The rig is too sensitive because it is too bottom heavy. If the weights came in finer increments we could have added or removed more weights. Since we don't have this option we'll have to raise the weights/contract the arch.

    Try pulling the weights to the left so the camera and weights become horizontal. This would be a good time to remember if all your silver locking and plate bolts are tight. You don't want the camera to fall off the stage! Then let go of the weights and count how long it takes for the it to cross vertical. With my rig setup it was less than 1 second. I reckon about .5 seconds it was already dropped. Yes, this is drop time.

    The rule of thumb is you want anywhere from 1 to 2 seconds of drop time. On the Blackbird I liked 1.5 seconds, but when I started I did 2 seconds. For Merlin's they recommend close to 1 second. On the Steadyvid Pro, I'm still at 2 seconds. You'll have to get a feel for it depending on your camera. The end state you want is for the entire camera and arch to move together as a unit. When you stop you don't want it to overly tilt or rotate. If it does rotate as it falls then adjust the camera a bit backward then try again.

    For the Canon 7D + Sigma 30mm + Filter it took about 15 clock-wise twists to get to the point where I was happy. Do a few twists at a time, move the camera around a bit, and observe how steady the head remains. Test the drop time. Then trim the balance. As you contract the arch the rig's COG changes so you have to continually adjust balance.


    Whew, if you've gotten this far you should be able to walk around a bit with the footage being fairly stable. There may be some effects of inertia where it acts like a boat. Or maybe an unruly helicopter. That could mean more tuning. What it probably means is the need to practice flying the stabilizer. Here's a hint: use both hands!

    On to Flying the Steadyvid Pro

    Tuesday, May 22, 2012

    Tips for the Opteka Steadyvid Pro - Part 1

    I have, or rather had, a CMR Blackbird. No, I didn't sell it. It's on the other side of the planet with the 2nd Unit. I had the complete kit with bag, extra weights and stand. The problem was carrying it on international flights took half my luggage space. Since it had more use where I had taken it, the Blackbird stayed. In the meantime I've been using a Gorillapod SLR as a sort of compact shoulder rig. It's been all over the country as far as Hawaii. But nothing beats a handheld stabilizer for dynamic shots. The Steadicam Merlin 2 was recently announced and I was interested. Only it was quite expensive at $800. Then while browsing through Amazon I happened upon the Opteka SteadyVid Pro. Hey! $179.95. Quite tempting.

    Pro:
    Cheap
    Compact

    Con:
    Poor documentation
    No markers for consistent setting
    Limited weight capacity
    Questionable durability

    There are more cons than pros. Did I mention it was cheap? I wouldn't trade my Blackbird in for the Steadyvid Pro. The Blackbird had documentation (manual, video and email support!), graduated markers and 8 lbs of capacity. It was worth the $670 for the complete kit ($470 for just the stabilizer). But what if you can't afford to spend that much for a stabilizer? You could go DIY. That's if you have the tools, skills and patience. Okay, I digress. Who would want a Steadyvid Pro anyway? If you want to dabble, the Steadyvid Pro might be a good introduction. If you want a 2nd stabilizer for infrequent use this might be for you. If you have no patience, you might want to stay away. You need to expend money, time and effort whichever stabilizer you choose. The expensive ones come with support. With the Opteka you get what you paid for. Which is probably why you're reading this. At this price point, you'll be dependent on other users to help you out. Hurray, user community!


    Batteries not included, some assembly required, your mileage may vary!

    Quick Control Guide and Concepts
    Before going into detail on how to balance, here is a quick guide to the controls and a hint on the concepts.
    The bendy-foldy part above the handle is called the gimbal. Above the gimbal is the camera stage. Between the stage and camera there is a plate onto which the camera is screwed on. There are knobs on the side and rear to adjust the gimbal position. In the above picture I've color coded the controls and the direction the stage or gimbal takes. Don't get confused by the opposite markings. The stage movement is opposite to the gimbal position. If the gimbal is moved left of center, the stage (as indicated by the bubble level) will lean right.

    One double-sided sheet is all the instructions that come with the kit. Help!


    The stabilizer is a really complicated looking version of a see-saw. If you remember your playground days, a heavy kid near the fulcrum of a see-saw can be lifted by a lighter child sitting further from the fulcrum. If they can find the sweet spot, both children can hang suspended off the ground. That's the state of equilibrium. With a stabilizer, the gimbal is the fulcrum. One short end of the see-saw is from the gimbal to the camera plate. The other longer end is from the gimbal to the weights on the arched shaft.

    On to Balancing

    Monday, May 21, 2012

    Lenovo W520 and Photoshop CS6 Scratch Disk

    Just upgraded to CS6 targeting the mSATA. On start there was an immediate error "Could not open a scratch file because the file is locked." Apparently, there is a bug in CS6 where it insists on using the C: drive, where I no longer have a Users directory. Looking across the net I found some clues.

    After a bit of experimenting, one did work. I held down just CTRL-ALT then went to the Start menu to start Photoshop CS6. A menu appears to specify the Scratch Disk and I point it to D:. The picture above was edited using Photoshop, so it worked!

    Wednesday, April 4, 2012

    Lenovo W520 and Photoshop GPU Enhancements Disabled

    After an NVidia update Photoshop CS5 kept complaining "Photoshop has discovered a problem with the display driver and has disabled GPU enhancement." A thread I found suggested to rollback the driver but that was not the correct solution. This other site gave me a clue. Optimus was assigned Intel HD graphics rather than the NVIDIA Quadro 2000M (or 1000M if that's what you have) to Photoshop. Auto is not a bad Global setting but not good for your CUDA enabled Adobe applications. You can customize the settings per program to the NVIDIA Control Panel either via Windows Control Panel or the taskbar applet for Optimus.


    Start -> Control Panel -> NVIDIA Control Panel -> 3D Settings -> Program Settings (tab) -> Select A Program To Customize: Add -> Find the exact photoshop.exe path in your Program Files -> Select the preferred graphics processor for this program: High-performance NVIDIA processor -> Apply


    Stop and Restart Photoshop. The error should have gone away. You can confirm you are using the NVIDIA graphics card by going to System Info.


    Help -> System Info -> Scroll down until you find Video Card: NVIDIA Quadro 2000M (or Intel HD Graphics ... which is the cause of your problem)


    Video Card Vendor: Intel
    Video Card Renderer: Intel(R) HD Graphics Family
    Display: 1
    Display Bounds:= top: 0, left: 0, bottom: 1080, right: 1920
    Video Card Number: 1
    Video Card: NVIDIA Quadro 2000M
    Driver Version: 8.17.12.7593
    Driver Date: 20110812000000.000000-000
    Video Card Driver: nvd3dumx.dll,nvwgf2umx.dll,nvwgf2umx.dll,nvd3dum,nvwgf2um,nvwgf2um
    Video Mode:
    Video Card Caption: NVIDIA Quadro 2000M
    Video Card Memory: -2047 MB
    Video Card Number: 1
    Video Card: NVIDIA Quadro 2000M


    Update: The above appeared to be a symptom of something wrong with the NVIDIA driver update as well. After fixing Photoshop I discovered that After Effects and Premier would fail to start with Sniffer_GPU.exe running a long time before Windows complains. I went through cycles of rollback and patch uninstall of Windows patches. And then putting them back when it didn't work. The final fix was to uninstall the NVIDIA Graphics Driver and rebooting. The reboot automatically reinstalled the graphics software. Another reboot later and the my favorite Adobe apps were all working again.

    Sunday, January 1, 2012

    Notes on Gopro Hero HD with a Parrot AR Drone

    The difficulty with mounting an Hero HD on the AR Drone has to do with keeping the center of gravity. I tried mounting on the the nose, but it was so front heavy it tended to crash after a 'Too Much Angle Emergency'. I read some modification threads with counter weights but was warned of pendulum problems. Mounting it on top of the battery's velcro kept the center of gravity but made the rotors visible. The trick was to raise the camera high enough. After some experimentation I've found that the Hero HD bottom needs has to be about 14.5cm from the Drone body in 720p mode. At 14cm you could still see the tips of the rotors a bit.

    I've managed to crash the Drone a few times and it survived along with the Hero HD. That was until the first live shoot, my brilliant mounting system lost its velcro and leaned right. This caused the Drone to drift right in a hover. It hit a wall and caused an auto cutoff. The Camera and Drone fell eight feet. The Camera lost the part of the long sequence after the battery flew out. I would have lost more if I hadn't copied the raw unindexed footage first before attempting the SOS recovery. Needless to say it still works. As for the Drone, it broke one of the gears which needs replacement, it won't fly for a while.

    Above mount tended to pendulum.

    This mount achieved level flight. The tricky part was keeping it balanced and attached to the body. Also no protection to the rotors.

    Lessons Learned:
    Outdoor mode and Outdoor Hull makes the drone finicky even without the wind. Don't use it.
    Watch the balance of the mount.
    Prepare some spare parts so your shoot doesn't get interrupted.

    Spare parts you may need after a crash.

    1. Spare Gear
    2. Spare Rotor
    3. Spare Cross Piece


    Equipment used