Pro:
Cheap
Compact
Con:
Poor documentation
No markers for consistent setting
Limited weight capacity
Questionable durability
There are more cons than pros. Did I mention it was cheap? I wouldn't trade my Blackbird in for the Steadyvid Pro. The Blackbird had documentation (manual, video and email support!), graduated markers and 8 lbs of capacity. It was worth the $670 for the complete kit ($470 for just the stabilizer). But what if you can't afford to spend that much for a stabilizer? You could go DIY. That's if you have the tools, skills and patience. Okay, I digress. Who would want a Steadyvid Pro anyway? If you want to dabble, the Steadyvid Pro might be a good introduction. If you want a 2nd stabilizer for infrequent use this might be for you. If you have no patience, you might want to stay away. You need to expend money, time and effort whichever stabilizer you choose. The expensive ones come with support. With the Opteka you get what you paid for. Which is probably why you're reading this. At this price point, you'll be dependent on other users to help you out. Hurray, user community!
Batteries not included, some assembly required, your mileage may vary!
Quick Control Guide and Concepts
Before going into detail on how to balance, here is a quick guide to the controls and a hint on the concepts.
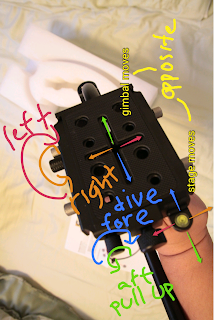
The bendy-foldy part above the handle is called the gimbal. Above the gimbal is the camera stage. Between the stage and camera there is a plate onto which the camera is screwed on. There are knobs on the side and rear to adjust the gimbal position. In the above picture I've color coded the controls and the direction the stage or gimbal takes. Don't get confused by the opposite markings. The stage movement is opposite to the gimbal position. If the gimbal is moved left of center, the stage (as indicated by the bubble level) will lean right.
The stabilizer is a really complicated looking version of a see-saw. If you remember your playground days, a heavy kid near the fulcrum of a see-saw can be lifted by a lighter child sitting further from the fulcrum. If they can find the sweet spot, both children can hang suspended off the ground. That's the state of equilibrium. With a stabilizer, the gimbal is the fulcrum. One short end of the see-saw is from the gimbal to the camera plate. The other longer end is from the gimbal to the weights on the arched shaft.
On to Balancing


No comments:
Post a Comment