Sunday, February 10, 2008

Protecting the Canon WD-H43 Wide Angle Lens


DIY WD-H43 Filter Adapter with UV Filter and White Balance Cap


The WD-H43 has no filter ring and uses a strange cap size. As it is there is little to protect the nice high definition lens from stray projectiles, sea spray, leaves, and twigs. I like to shoot outdoors romping merrily through grass, twigs and branches while grown men with toy guns lob tiny plastic pellets at upwards of 280fps. Needless to say I was worried for my lens.

So I asked around but found no easy answers to solutions. Someone did point me to a CAVision lens clamp to adapt 75mm lens, the WD-H43 is 74.5mm which is close enough, to 77mm which I ordered from my favorite camera store. That was late September 2007. It's been on backorder since then and delivery won't happen until middle of 2008 if all goes well. Naturally I was frustrated in not being able use the lens with the great abandon I prefer. I tried a few ideas to hold a filter including using rubber plumbing parts. Finally I've come up with an interim solution that works.
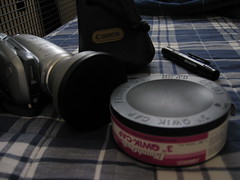

A failed experiment


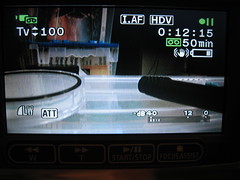
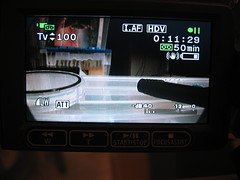
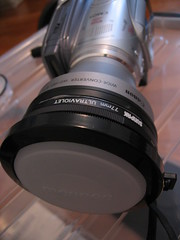
I use a spare lens cap for the WD-H43 and then cut out a hole for the lens. I glued a 77mm filter ring on to it then mounted my choice of 77mm filter. In this case I chose a low profile 77mm UV multicoated filter like those used in DSLRs. I did some experiments on how deep a stack I could use without the rings showing in the footage and the most it might do ('m guessing) is two. It would be three if I kept the glass on the glued on ring but I didn't. I shot test video which will be posted at a later date. Update: The LCD doesn't show the overscan area so it appears that more than 1 ring on the stack would be visible in the footage. Not one wanting to crop good video out, I put the filter glass back on.

For now here's some pictures to give you an idea of what it looks like.
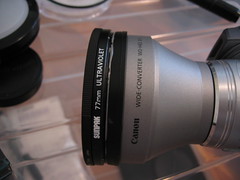

DIY WD-H43 Filter Adapter with UV Filter without the White Balance Cap


DIY WD-H43 Filter Adapter with UV Filter only


DIY WD-H43 Filter Adapter with UV Filter and White Balance Cap

Friday, December 7, 2007

Making the Most of the Omnitech 11.3 Digital Frame

I was at Staples for the BF 2007 sale and picked up the bigger digital frame for my mom. The Omnitech 11.3 appears to be a rebrand of the same unit sold by Smartparts for its SP1100. Getting pictures to work was fairly straightfoward. Plug in a card or load something into its internal media and away it goes. The slideshow is default at 5 seconds. One thing to watch out for, the slideshow menu doesn't give you any setup options. You have to be at the photo/video/music menu then press Menu on the rear of the display or Setup on the remote to get to all the options. But even with the Optimal scaling option activated it doesn't scale portrait pictures as nicely as I'd like. But if you resize your images it works well as long as a scaler isn't involved. The LCD likes 16:9 resolution and its 800x400 screen is decent enough.

The tough part was getting video working correctly. I have a Canon S410 and its AVI files play okay on the unit. The 4:3 video was stretched to the 16:9 screen and the audio played fine. But getting my own HDV/DV/WMV/MP4 to playback wasn't straight forward. For one, the unit needs the video to be in an AVI container. And MPEG-4 codecs are not recognized. It seems the software was optimized for the kind of video recorded by digital cameras. So after editing via Sony Vegas I had to pass the video through SUPER(c). 640x360 video with M-JPEG and PCM in an AVI container worked.

There's a music function but it doesn't appear to playback MP3 files. It will take WMA audio files (ironically it doesn't play WMV). I had to install Windows Media Encoder and VCM to convert the music. I'm not sure how Mac users would be able to get around this. And I like how slideshow will play the WMA concurrently but wish that it would playback my AVI files as part of the shuffle. Oh well, can't have everything.

Wednesday, November 28, 2007

Convert 60i to 60p Revisited

A few questions were posted to me via YouTube on how to do 60i to 60p conversion. In a previous post I showed how to use Vegas velocity envelopes to do time remap effects. But I only mentioned the conversion process in passing with thread links on how to do it. For convenience here are two methods that have worked for me:

Standard Vegas
1) Create a Custom Project with 60p frame rate
File -> Properties -> Video -> Field order: None (progressive scan) -> Frame rate: 59.940 (Double NTSC) -> Save -> Ok
2) Load your HDV clip
3) Enable Smart Resample (this is default)
Right-click on clip -> Properties -> Smart Resample -> Ok
4) Encode video to a 60p progressive format
File -> Render As -> Pick a codec capable of progressive -> Custom -> Frame rate: 59.940 -> Apply -> Give the file a name -> Save

Mike Crash Smart Deinterlace Plugin
1) Create a Custom Project with 60p frame rate
File -> Properties -> Video -> Field order: None (progressive scan) -> Frame rate: 59.940 (Double NTSC) -> Save -> Ok
2) Load your HDV clip
3) Disable Smart Resample
Right-click on clip -> Properties -> No Resample -> Ok
4) Apply Smart Deinterlace to the video track
Video FX -> Smart Deinterlace (you must have loaded the plug-in previously) -> Drag effect to the track (not to the clip) -> Ok (use defaults)
5) Encode video to a 60p progressive format
File -> Render As -> Pick a codec capable of progressive -> Custom -> Frame rate: 59.940 -> Apply -> Give the file a name -> Save

Gotcha
The critical part is to encode in a progressive codec. HDV is interlaced. When using the Main Concept codec go to the Video tab and select Output Type MPEG-2. WMV and MP4 are always progressive.


References:
Glenn Chan's notes on Mike Crash's filter
http://dvinfo.net/conf/showthread.php?t=52097

Sunday, November 4, 2007

Simple Cutout Animation with CreaToon


If you're looking for a simple 2D animation package look no further! CreaToon is great for simple cutout animation like talking heads. Before I found this I was going to use Blender 3D and learn all the rigging. It saved me some time coming up with a funny effect I wanted.

CreaToon can take most image formats such as JPEG, Targa, and PNG. I like PNG as it allows for Alpha Channels to make the background transparent. This means I could edit a graphic using Paint.NET then animate it. Attaching the body parts of an animation is easy to follow through the online tutorial. Within half a day I had a minute long voiceover and animation sequence working together for my cutout characters.

With the sequence done I was able to put it in front a green background and export to AVI. Imported into Sony Vegas I applied a Chroma Key reapplied the audio and was all set. CreaToon was also capable of exporting image sequences but this method seemed easier for my style of editing.

References:
http://www.creatoon.com/index.php

Sunday, September 9, 2007

Slowmo and Speed Up Effect 300-style


Here's my attempt at the 300 style special effect. It works quite well for the HV20 with its high resolution picture and choice of manual settings. Good light is important to allow TV-500 or TV-250 mode. This eliminates motion blur. Shoot from a stable platform to reduce obvious rolling shutter. Then capture your 60i.

Convert your 60i to 60p using your choice of deinterlacer. Smart Deinterlace based on VirtualDub's works quite well. As for the codec, choose one that supports 60p such as Lagarith/Uncompressed AVI, WMV or H.264. Then feed the clip to an NLE that can do velocity envelope/time remapping. Speed up/ramp up the broad movements while at wide. When you find the terminus of an action, back off a bit then slow down to at least half normal speed (I like to go down to 0% in a V or U for Vegas velocity envelopes). Keep that for a few seconds then return to normal. To accentuate the slow mo portion, use digital zoom to the area of action.

Sony Vegas example:

http://img127.imageshack.us/img127/9803/300stylevegassettingsls7.jpg

References:
http://dvinfo.net/conf/showthread.php?t=64785&page=2&highlight=ghost
http://dvinfo.net/conf/showthread.php?t=93587

Friday, July 27, 2007

Sleep is Close Behind


Shot in PF24 mode with Shutter Priority (TV) 6. Camera was inside the car propped against a seat on a monopod and a backpack. Driving was done well within the speed limit trying to avoid large bumps. Captured footage to Sony Vegas as M2T then increased speed to 12x by setting clip speed to maximum (4x) and adding maximum velocity envelope (3x).

Sunday, July 15, 2007

Bleach Bypass on HDV

I've been trying out various Bleach Bypass techniques on 60i and 24p footage. It appears source matters a lot. HDV is 4:2:0 while DV is 4:1:1 for NTSC. It appears that DV with its compressed colors is easier to bleach using color curves, saturation, and color overlay. HDV, at least the color rich kind made by the HV20, needs to be desaturated to as low as 20% on the bottom layer. Sometimes it even helps to give a color tinge to the entire clip too. More experimentation to be done!


References:
http://www.finalcolor.com/bleach.htm
http://www.creativecow.net/articles/onneweer_barend/colorgrading_1/index.html
http://www.dvinfo.net/conf/showthread.php?t=14222&highlight=kings
http://www.sundancemediagroup.com/articles/glennchan/levels_in_sony_vegas_part_two.htm