Showing posts with label agus35. Show all posts

Wednesday, November 12, 2008

YSM35B Asian Macro Tube to 58mm Thread

This is the first in the series of instructions on how to build the YSM35B Vibrating 35mm DOF Adapter based on the parts lists of the YSM35(A). The build will be nearly the same except I'll be using a 58mm Opteka HD^2 Macro plus a smaller power pack.

At the end of this series you will know how you could build one yourself. Or know enough about how one is built to diagnose problems with your existing adapter.


Putting a 58mm Thread on the Nikon Macro Tube
For this part we'll recap how to modify an "Asian Macro Tube" with Nikon F Mount to have a standard 58mm filter ring. You will need the following items:

Asian Macro Tube with Nikon F-mount
58mm UV Filter
Two Part Epoxy (e.g. JB Weld)
2 Flat Head precision screw drivers (or a drawing compass)
Paperclip
Plastic Card
Isopropyl Alcohol


Use a non-slip pad to remove the glass from the UV filter. We only want the ring to convert the 57mm tube to 58mm. Use the two screwdrivers or compass (the drawing tool not the magnetic direction finder) to twist the inner ring counterclockwise. Applying downward pressure helps. This will unfasten the ring. Once you have it out remove this retaining ring and the glass.
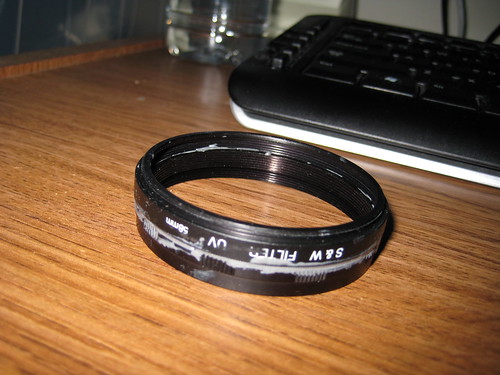


Take the Asian Macro and find the "1" ring. Set the rest side. You can discard the ring with the bayonet mount. Clean both the filter thread and the "1" ring with isopropyl alcohol. Set aside.

Mix the two part epoxy on a piece of carton or paper with a paper clip. JB Weld is good. There is a white and black tube. The black one is harder to get the contents out. You will get a grey goop. Apply the goop to the rear thread of the "1" ring. Make sure to have some all around. Then stack the 58mm filter on top of this. The epoxy may get squeezed out on the sides and the inside between the threads.

Press and hold for a few seconds. While the goop is still soft use the plastic card to scrape the excess from the outside. Inspect the front inner thread of the "1" ring and the rear outer thread of the 58mm filter. Clean out any goop on it. Allow this to cure for 24 hours. It will cure faster in warm weather.

Why did we do this?
The Asian Macro tube is the body for the adapter. The ones off Ebay were 1mm too small. We need a standard 58mm thread to attach a macro, circular filter, and 43mm to 58mm step up ring later.


What is next?

The next post will be about how to build the vibrating mount.

Thursday, March 22, 2007

Macro might not be needed afterall

I am being silly again. Testing the ZR200 with various zoom settings and manual focus proved that the 28mm lens on the camcorder is able to focus on objects very closely. The trick was to have something with good contrast in front of the ground glass while adjusting the zoom and focus.

No Achromat Just Yet

The seller for my binoculars ran out of stock. Might as well, I just learned that there is some color casting from those front lenses. Sourgrapes? Probably. On a brighter note, I have some parts coming in for the second prototype which will be a static/vibrating gg based around a Nikon F3 Type D focus screen.


This focus screen is thicker than the Canon Ee-A that other builders use because it has a built in condenser. The condenser is a plano-convex (PCX) lens that magnifies the amount of light that goes to the focus screen. That's a lot of big words! Not that I know a lot about optics, I'm still learning what it all means. I should explain it some more on this blog as each concept is understood by me. But the PCX simply means that the image that gets on the focus screen is brighter. More light to the focus screen makes it easier for the camcorder to record an image.

The Type D focus screen is, incidentally, a favorite for astrophotography. And it is supposedly has such a fine grain that it could be used static. The static design is based roughly on the aldu35. This was a parallel development for the spinning agus35. The aldu35 was later improved by having the gg vibrate to blur the grain.

All this talk is making me anxious. I sure hope that +10 Macro comes in soon so I can have prototype 1 working.

Monday, March 19, 2007

You need a Macro!

Sharp focus was fairly easy to eyeball on the spinning gg and the Nikon F3 Type D focus screen. Just move it closer or further until you get a sharp image with the lens set to infinity. The tricky part was getting the camcorder to focus on the ground glass. What the human eye can see sharply does not translate to what a single CCD camera can see. It's a very small target (maybe half an inch high and an inch wide of good image) even for the small 28mm lens on the Canon ZR200. Using the Canon S410's video mode wasn't any good since there is not way to engage macro and photo at once. I don't know too many camcorders with a macro mode so I probably will need a set of macro lenses.


But this doesn't stop me from conducting experiments. The spinning disk really is good for a nicer image. And the distance from lens to ground glass matte side was about 40mm. That's 6.5mm shorter than advertised for the Nikon F mounts. Maybe I'm doing something wrong? Fortunately its all adjustable. (Update: I was being silly measuring from the back of the lens to the ground glass. 46.5mm is measured from the F mount to the matte side of the ground glass. So my flange focal length to focal plane is really 46.5mm give or take!)


The spinner is half-built. I have to look for Macro lenses to help the camcorder out. At first I thought to just go out and buy 28mm close-up (I don't mind chromatic aberation at this point). But then I thought that a macro lens like any other magnifier will look warped unless I get a bigger lens. I don't know if that's right but it probably won't hurt. At least I hope not.

Saturday, March 17, 2007

Progress and Frustration

I have a half working prototype now. Since its night and indoors the furthest my infinity focus can go is the door. I don't know if this is it or something else, but instead of the 46.5mm distance I was expecting for F-mount I had to use 40mm distance between back of lens to frosted side of ground glass.

There was trouble focusing on the ground glass while zoomed in. The human eye can resolve the detail but the Canon ZR200 and S410 would just record points of light. Maybe I need a macro or an achromatic diopeter. But that will have to wait. I can't even prop the device up right now for lack of ballast and screws.


At wide-angle, you can focus on a subject as close as 1 cm (0.39in.).
- Canon ZR200 manual


I was hoping that I wouldn't need a macro (I also hear the term relay lens -- could this be the generic term) because my lens was less than 43mm.


After carefully drilling the center and pilot holes I set the circle cutter to 2cm. Control was difficult at best when cutting three stacked boards. The result was a poorly controlled cut that was too wide to put the mounting screws. I had enough board left over to make a patch panel but that messess up the even alignment of my screws. DIY is full of challenges.

The Right Tools

You can't do the job right without the tools.

* Precision Philips #00 screwdriver
* Cutting Tools: Handsaw, Rotary Tool/Drill, Box cutter
* Sandpaper
* Metric Ruler with metal edge
* Eye Protection


Sacrificing the Nikon EM


I had to buy the philips #00 screwdriver to remove the screws from the camera body. Fortunately the local Ace Hardware sold it in singles since I already had toolkits with other sizes. For cutting plastic and plywood, choose your poison. I have a Dremel XPR 400 with a circle cutter to make my circle cuts. It's also possible to do the job with a box cutter if you don't mind taking a while to cut through plywood. I would have used particle board but I couldn't find any. At one point I considered using carton but I was worried my screws wouldn't hold on that material. It would still work with glue but I want to prototype first. The sandpaper is good for removing burrs on wood and plastic. As for the Metric ruler, its just easier to deal with millimeters than fractions of an inch for precision work. The eye protection is standard but shouldn't be ignored!

Friday, March 16, 2007

Lenses and Mounts

I chose to go Nikon by recommendation. The F-Mount has been around a long time. Lenses are fairly easy to find.

Lenses
Most people start with a prime lens (as opposed to telephoto/zoom and wide lenses). A lens from f/2.0 to f/1.4 (lower is better) is considered fast . The 50mm f/1.8 prime lens is most common and should be available from Ebay and various camera stores used. If you're lucky you can buy a complete vintage film SLR camera with a good prime lens for cheap (<$50). There are f/1.2 and f/1.0 lenses but these are very old discontinued lenses that fall in the category of legend and luxury. When buying a lens its important to make sure there are no scratches or fuziness. If the lens needs cleaning or ever had fungus then its no good. As for the funny acronyms such as NAI, AI, AIS, etc. If it says F-mount somewhere and says manual it's good for our purposes. If the age indicated is 1977 or later you should be confident. The variations refer to how the mechanism control focus. We won't be using any of those functions. Unless you are a wiz at disassembling SLRs there's little chance of every using autofocus mechanism on these cameras. So go cheap and simple.

Mounts

We have to mount the camera lens to our aparatus somehow. There are many options for getting hold of an F-mount.

  • Cannibalize the F-mount from a Camera Body
  • Cannibalize the F-mount from an Adapter (like a C-mount to F-mount adapter)
  • Use a rear Nikon lens cap
The last option is the cheapest. I don't know how well it will stay fixed since it will have to be glued. You also need to cut out the bottom to make a hole. An original Nikon LF-1 will set you back $9 to $12 plus taxes/shipping. You can get really cheap third party ones from Ebay for $5 shipped if you know where to look. Or you may be able to beg one off your camera friends.

Personally I like to use screws more than glue. Glue is tricky to adjust because I work slow. So I bought an old circa 1979 Canon EM. It had a 50mm f/1.8 Series E lens and the four screw F-mount. I may have to supplement the screws with glue later on but that only makes the job easier. Since my first prototype will be a spinner I don't need the fancy tube style adapter.


References to Lenses and Mounts
http://www.nikonlinks.com/unklbil/bodylens.htm
http://www.photoethnography.com/ClassicCameras/Lens-F.html
http://rick_oleson.tripod.com/index-153.html
http://www.nikonlinks.com/unklbil/nomenclature.htm

Update
Another alternative for F-Mount:
Nikon part number 2717, K3 Female Nikon Bayonet F-Mount - for Custom Applications

Thursday, March 15, 2007

The Wily Frosted Maxell CD-R ground glass

Supposedly there are nicely frosted fake CDs in the 25pk Maxell CD-R cakeboxes. Maybe maybe they were more abundant in 2004. But it's now 2007 and I had a hard time finding one.

I used to have those frosted plastic disks that protected CDs/DVDs in a cake box. Just last year I threw out my empty spindles with those non-crystal blanks. Little did I know that I might want them a year later. In desperation I tried to sand my own ground glass from some crystal DVD-R blanks. Not having any 1500 grit wet dry sandpaper handy, I used a sheet of metal sandpaper that was lying around from repairing some car rust. This was Norton brand from the Home Depot with no grit rating on it. It was marked "fine" which I guess is about 100-200grit. Apparently, "fine" wasn't fine enough as I tested my poor groundglass. The light loss was horrendous.

So I scoured several stores to find the elusive ground glass (gg). Walmart had 25pk Maxell CD-R but these were the 'printable' type. Looking through the top I couldn't tell if there was a frosted there. This was not to be mistaken for the CD-R Pro with its gold surface and no frosted cd. There were several cakeboxes by Memorex, Sony, TDK, and Imation but none of them had it. Once I got fooled by the milky translucent look of the Memorex 15 pack so learn from my mistake. The best bet is to look for silver top CD/DVD. The clear cakebox is an even milky color but the frosted blank will make it look rough and spotted. It will look like it has dust particles around it but its somewhat evenly spaced and distributed.

Best Buy, Circuit City, CVS, RiteAid, Radio Shack, Target and the local supermarket saw me inspecting every brand they had. Even among Maxell brands you must beware. I think the trick is to find a place with old stocks of CD-Rs. So I went to a lonely FYE near a huge Barnes and Noble. In a corner mixed in with white and blue-green 50pk Maxell CD-Rs was one cakebox of its older stock. Instead of the 56x, I grabbed the 40x all green 50pk Maxell CD-R box. The cover was a bit dusty so I had to really examine the top against the light. Seeing the small white dots and bumps told me it had a frosted CD.

Back home there was a cheap Durabrand CD player. Little did it know its life as a portable entertainment device was coming to a close.

Frosted vs Sanded

The beginning of the Depth of Field experiment

To record our field games I bought a cheap Mini-DV camera. We were going to make a nice group video to commemorate the year and I thought it would be nice to do film-look with shallow DOF. So I read up on how to do it, and bought a bunch of Neutral Density filters to control the f/stops. But we never got time to try it since we were busy running around the game field. It didn't help that the camcorders pulled double duty as helmet cam recorders.

Anyway I never got to try the filter technique but still went ahead with the video. Some lucky angles and amateur composition took out most of the distracting elements in the image. Queue in a good story and dramatic soundtrack to top it all off. The video was done but not as nice as we want it.

Now we're embarking on a new endeavor. We're setting up video reviews of game gear so I'm back at the DOF question. My brother has been using DSLRs and is pretty good at it. He pointed out 35mm DOF adapters from M2. From there I backtraced it to the Agus35 documented in dvinfo.net. Yippee! Another topic for my evil experiments! Soon I shall flood the world with exceedingly bad and cheesy videos!

References:
http://www.dvinfo.net/conf/forumdisplay.php?f=70
http://www.mediachance.com/dvdlab/dof/index5.htm
http://members.chello.nl/a.schultzevspierenburg/wax/wax2.htm
http://www.jetsetmodels.info/news.htm