Field of View
Comparison of the field of view you get at various focal lengths and lenses. It's easier to visualize with pictures. The camera is a Canon Rebel T2i (aka 550D) which has an APS-C sensor (1.6 crop factor). Camera is tripod mounted while lenses are changed. Sorry, I forgot to take "normal" range photos with the zoom. I'll do a second set of tests for that. These still images are at 4:3 Aspect Ratio. Video mode will crop the top and bottom to form a 16:9 image.
11mm (17.6mm effective)
Tokina 11-16 AT-X Pro 2.8 (Zoom)
16mm (25.6mm effective)
Tokina 11-16 AT-X Pro 2.8 (Zoom)
18mm (28.8mm effective)
Sigma 18-50 EX DC Macro 2.8 (Zoom)
50mm (80mm effective)
Sigma 18-50 EX DC Macro 2.8 (Zoom)
50mm (80mm effective)
Nikkor SC 50mm 1.4 (Prime), adapted from F-mount to EF
Note how the view is narrower than the Sigma above. Infinity focus is slightly before the infinity marker on the lens.
70mm (112mm effective)
Canon EF 70-200 F2.8/L IS (Zoom)
85mm (136mm effective)
Canon EF 85mm 1.8 (Prime)
200mm (320mm effective)
Canon EF 70-200 F2.8/L IS (Zoom)
Focus Breathing
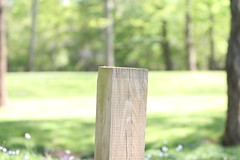
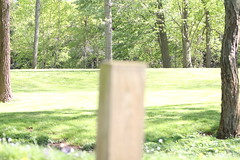
A slight change of FOV may be observed when changing focus. All the SLR lenses from the previous test exhibit this to some degree.
Focused to Foreground
Note the trees on either side of the picture. Focus to foreground which is about 9 feet away shows less of trees on either side. Lens is a Canon EF 70-200 F2.8/L IS at 70mm.
Focused to Background
Focus to background shows more of the trees on either side. Lens is a Canon EF 70-200 F2.8/L IS at 70mm.
The controls behave differently between stills and video mode. This is for video mode.
Switch to Video Mode T2i
Turn mode dial to movie icon. Message appears if adapted lens is attached. Mirror locks up, LCD or external monitor turns on. Push Live View button on camera's back to record. Red circle appears in upper right when recording.
7D
Push throw switch left to movie icon on camera's back. Message appears if adapted lens is attached. Mirror locks up, LCD or external monitor turns on. Press Start/Stop button to record. Red circle appears in upper right when recording.
Changing Video Shutter Speed T2i
Turn wheel near shutter button right to increase shutter speed. Recommended shutter speed is 50 (1/50) for 24fps, 60 (1/60) for 30fps, and 120 (1/120) for 60fps. This is to conform to 180-degree shutter rule.
7D
Turn wheel near shutter button right to increase shutter speed. Recommended shutter speed is 50 (1/50) for 24fps, 60 (1/60) for 30fps, and 120 (1/120) for 60fps. This is to conform to 180-degree shutter rule.
Changing Aperture of EF Lenses T2i
Hold down AV button near LCD. Turn wheel near shutter button right to increase F-stop (darker). Turn left to decrease F-stop (brighter).
7D
Turn body dial right to increase F-stop. Turn body dial clockwise to increase F-stop (darker). Turn counter-clockwise to decrease F-stop (brighter)
Changing ISO (boost brightness) T2i
Press ISO button once near shutter button. Turn wheel near shutter right to move from Auto ISO, 100, 200 ... 6400 (default, extended ISO turned off). LCD displays ISO value in lower right corner. Selection wraps around.
100-400 ISO typical for daylight. 1600 indoors starts to show image noise. Default Max setting is 3200 for Auto ISO.
7D
Press ISO button once near shutter button. M-Fn wheel near shutter right to move from Auto ISO, 100, 125, 160, 200, 250 ... 6400 (default, extended ISO turned off). LCD displays ISO values. Selection wraps around.
100-400 ISO typical for daylight. 1600 indoors starts to show image noise. Max gain in Auto ISO feature is not available on 7D. Maximum Auto ISO is 6400 when high mode is not enabled.
The HD Helmet Hero doesn't have a nut to go with every mount. My Google searches misled me at first. 10-32 is NOT the correct size. It's Metric 5mm. At Home Depot you can find it in the red trays marked Hex Nut 4-12mm size. You want the one marked HEX NUT 5mm-8 which contains 2 pieces. It was $0.41 + tax at the time of this post.
This video won Vimeo's Weekend Project in late January 2010. The project was to make "fake slow motion" where it's the actor moving slowly while the shot is rolling at normal speed. To pull off the illusion required some thought and planning.
Seven Factors for success:
1) A tripod
2) Slow but fluid motion of the actor
3) No extraneous background movement
4) Accent special effects
5) Appropriate sound
6) Cuts every three seconds
7) Appropriate story
Tripod
A stable shot is important. The tripod is the easiest tool to work with in this case. The video was shot at 24 fps. Camera motion is more apparent at lower frame rates. I made sure the wind wouldn't shake the camera. Also be careful to avoid placement near foot traffic. Where possible I turned on the IS feature on my lens.
Slow but Fluid Motion
You need to select comfortable positions and motions. Shots standing still while turning were the easiest to do. Just don't blink. Literally, don't blink! That ruins the illusion. The hardest part of this video was slowing down the opening of the box. It tended to spring on its own. You'll also have to factor where the camera will be for the shot. In this case it was between the arms which did not help.
No Extraneous Background Movement
Indoor scenes are easiest because you can control the environment. For outdoors you have to watch what's behind you. In this video there were people taking dogs out for a stroll. The wind also picked up on occasion. I had to wait for the environment to be right before shooting. Multiple takes are important.
The 7D helped thanks to the shallow depth of field. I opened up the aperture to its widest and framed the shot to limit the distractions. For this video I used a Sigma 18-50 EX Macro F2.8 for the indoor scenes. I used manual focus mode to fix the area in focus. Outdoors was shot mostly with a Canon 70-200 F2.8. I had to mind the minimum distance to get the shots I wanted.
Accent Special Effects
The special effects were made with effects of Sony Vegas 8. Here are the important ones.
Tie in the Wind
I drew a red trapezoid with a dithered fill using MS Paint. Then I deleted the background in Paint.NET. The image was saved as a PNG file with alpha channel. This was imported into its own track in Sony Vegas. I turned on track motion and applied a warp effect to the image. I animated the wave and tweaked it until I got a smooth flutter motion. The track motion was important to keep one end of the tie fixed on the neck. Take note that the real tie was tucked behind the collar under the suit for this shot. To sell the illusion the shirt front has to be bare.
I came to the idea of the fluttering tie while I was thinking of things that would look cool in slow motion. You know how superheroes are shown with capes flying in the wind. Why not a tie? With the animated tie the faked slow motion is complete.
The Bird
Same idea as above but implemented differently. I had one still photo of a pigeon from a while back. I manually edited components of the still into two three key frames of the bird. Then I put it into the timeline with some overlaps. Sony Vegas interpolated the frames with overlaps which gave me extra effects. I animated the track to give it some movement.
Rain
I wasn't too happy with the fake rain. Controlling its motion was hard and it didn't quite work. If I knew Blender I would have animated some particles. Since I didn't I settled with this technique I learned from Youtube.
Appropriate Sound
I cut out the original sound entirely. The ambient noise would not have synced to what the video portrayed.
Cuts every Three Seconds
This is just my style. To keep the story moving without being too hurried I used three seconds between cuts.
Appropriate Story
Slow motion, real or fake, is easier to believe for two kinds of story plots: heroism and tragedy. That's just my opinion. Okay, so maybe it's also good for comedic effect. But that would be good for maybe one shot.
I bought Cinescore until Sony pulled the product. Since its library is so limited I started looking elsewhere. So far the only other good source I've found is Stock20. Thank you guys at DVInfo for the tip. The license agreement is quite generous in terms of use. I got mine half off thanks to a fund drive they were running. The special offer arrived by email after signing up for notification.
The gimbal is based on the WSCATLER Design #4. It has a Traxxas 5151 as its base and two skateboard bearings. Instead of a flashlight I am using Sch 40 PVC fittings. The base is attached to a Manfrotto 357 for demonstration.
The shaft end is M5-.8 according to the metric guide at Home Depot.
And skateboard bearing barely fits in a 3/4" PVC pipe. It needs shaving to fit but it will.
A Maglite Mini head is the exact diameter of the skateboard bearing on the outside. Forturnately there is no way to shave the inner cavity to make it fit. Use PVC or find another flashlight to use. The brinkmans are too large and the electronics are not easy to get out.
 Field of View